BBPOS Wisepad 2 Plus
Mobile Phone Version
IMPORTANT!
- Check the identity of the third-party personel who become maintenance personel before being allowed access to inspect device.
- Do not install, replace, or dismantle the device without verification from support@cashlez.com
- Be aware of any suspicious actions toward the device. For example, and unknown person opens, disassambles, or replace a part of the device.
- Report immediately to support@cashlez.com if there are suspicious actions such as indications of damage and or device replacement without verification to support@cashlez.com
Download Cashlez Application
- Choose Cashlez Application in Google Play or App Store.
- Press Install.
Reader Activation

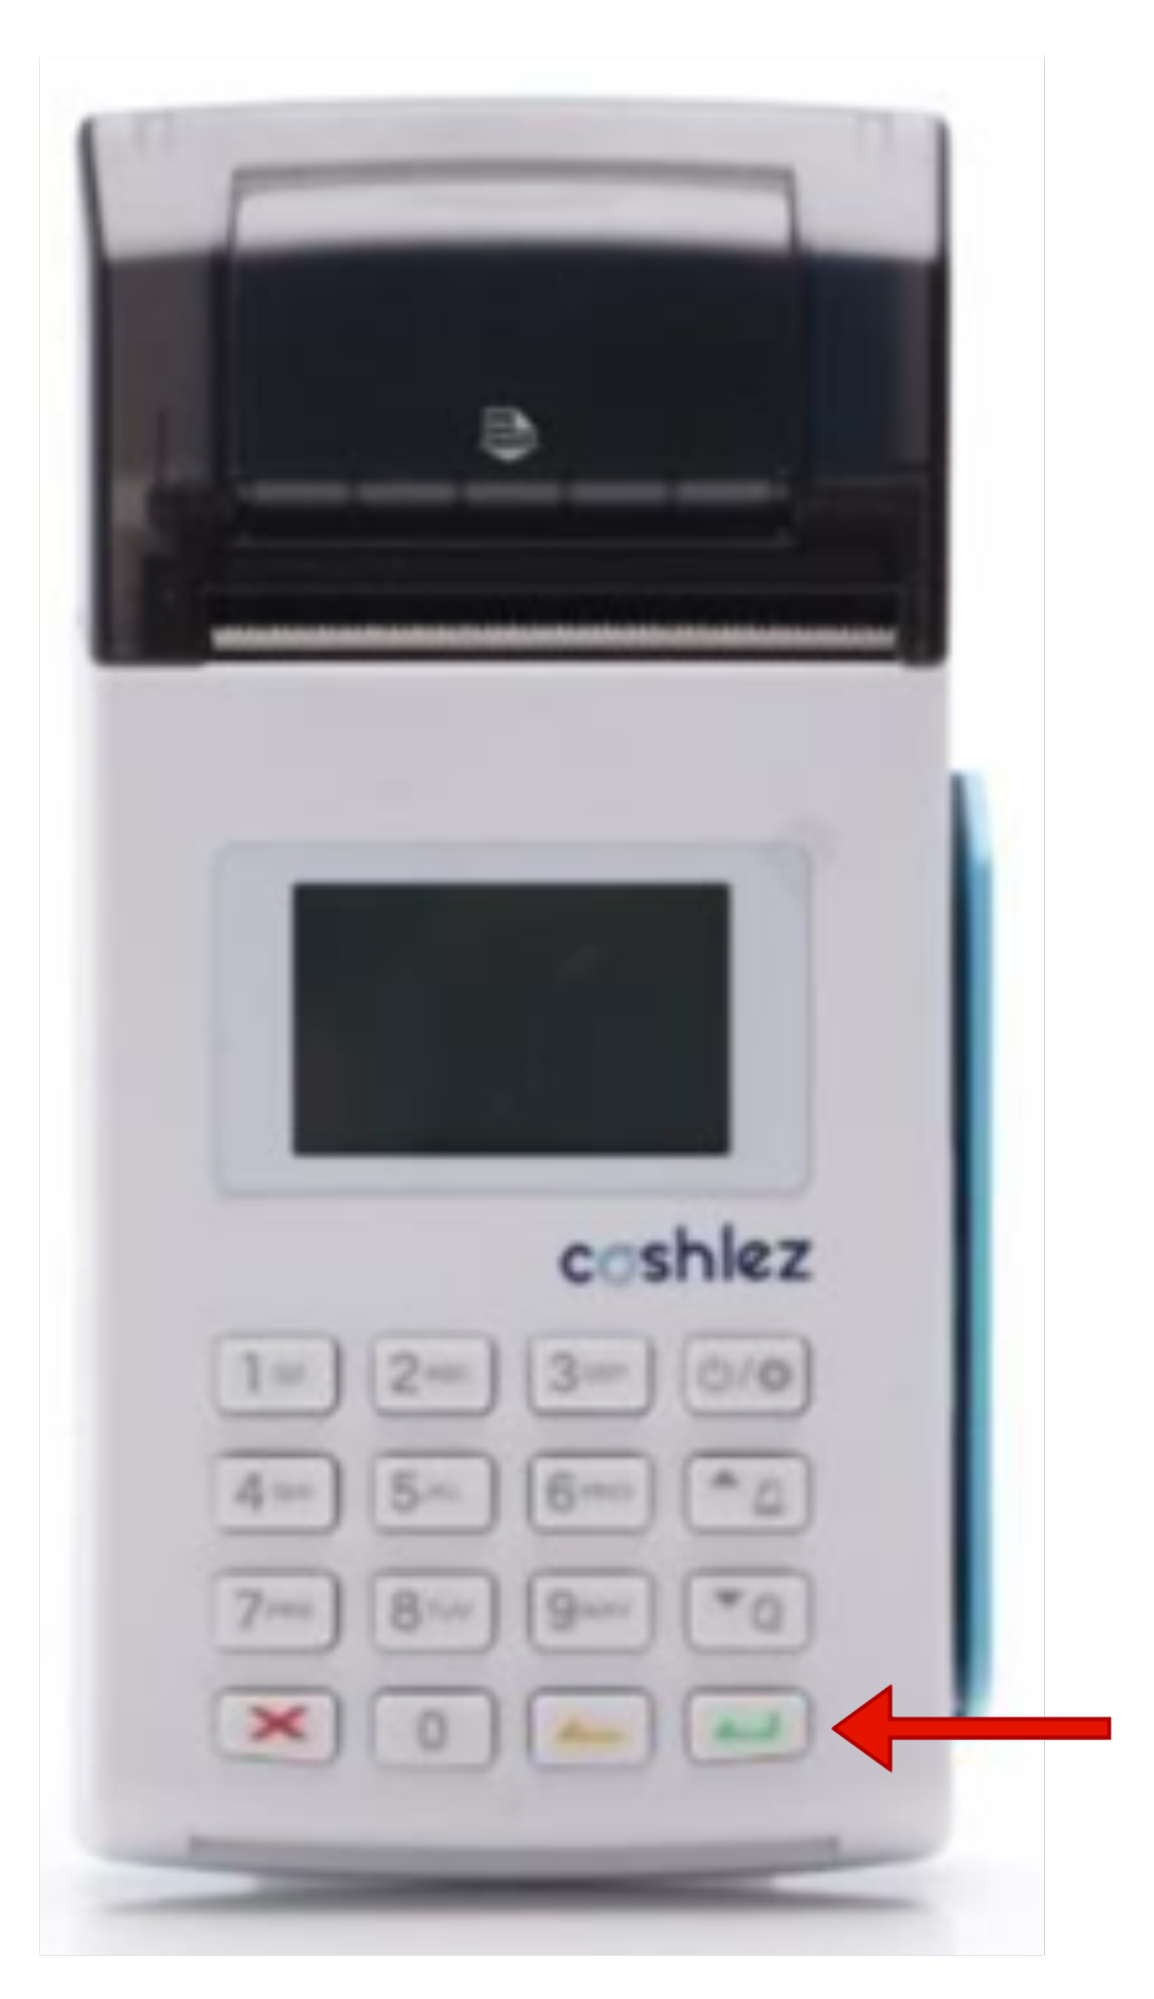
| No. | Indicator | Description |
|---|---|---|
| 1. | Card Swipe | A place to swipe a non-chip debit/credit card. |
| 2. | On/Off Button | Button to turn on/off the card reader. |
| 3. | Enter Button | Button to approve/continue activity. |
| 4. | Clear/Cancel Button | Button to prevent changes from activity. |
| 5. | Card Insert/Card Chip | A place to dip debit/credit cards with chips. |
- Activate the reader by pressing the Power button for a few moments.
- Check the mobile internet connection and make sure the internet/wifi data package is connected.
Sign Up

- Click Sign Up to register.
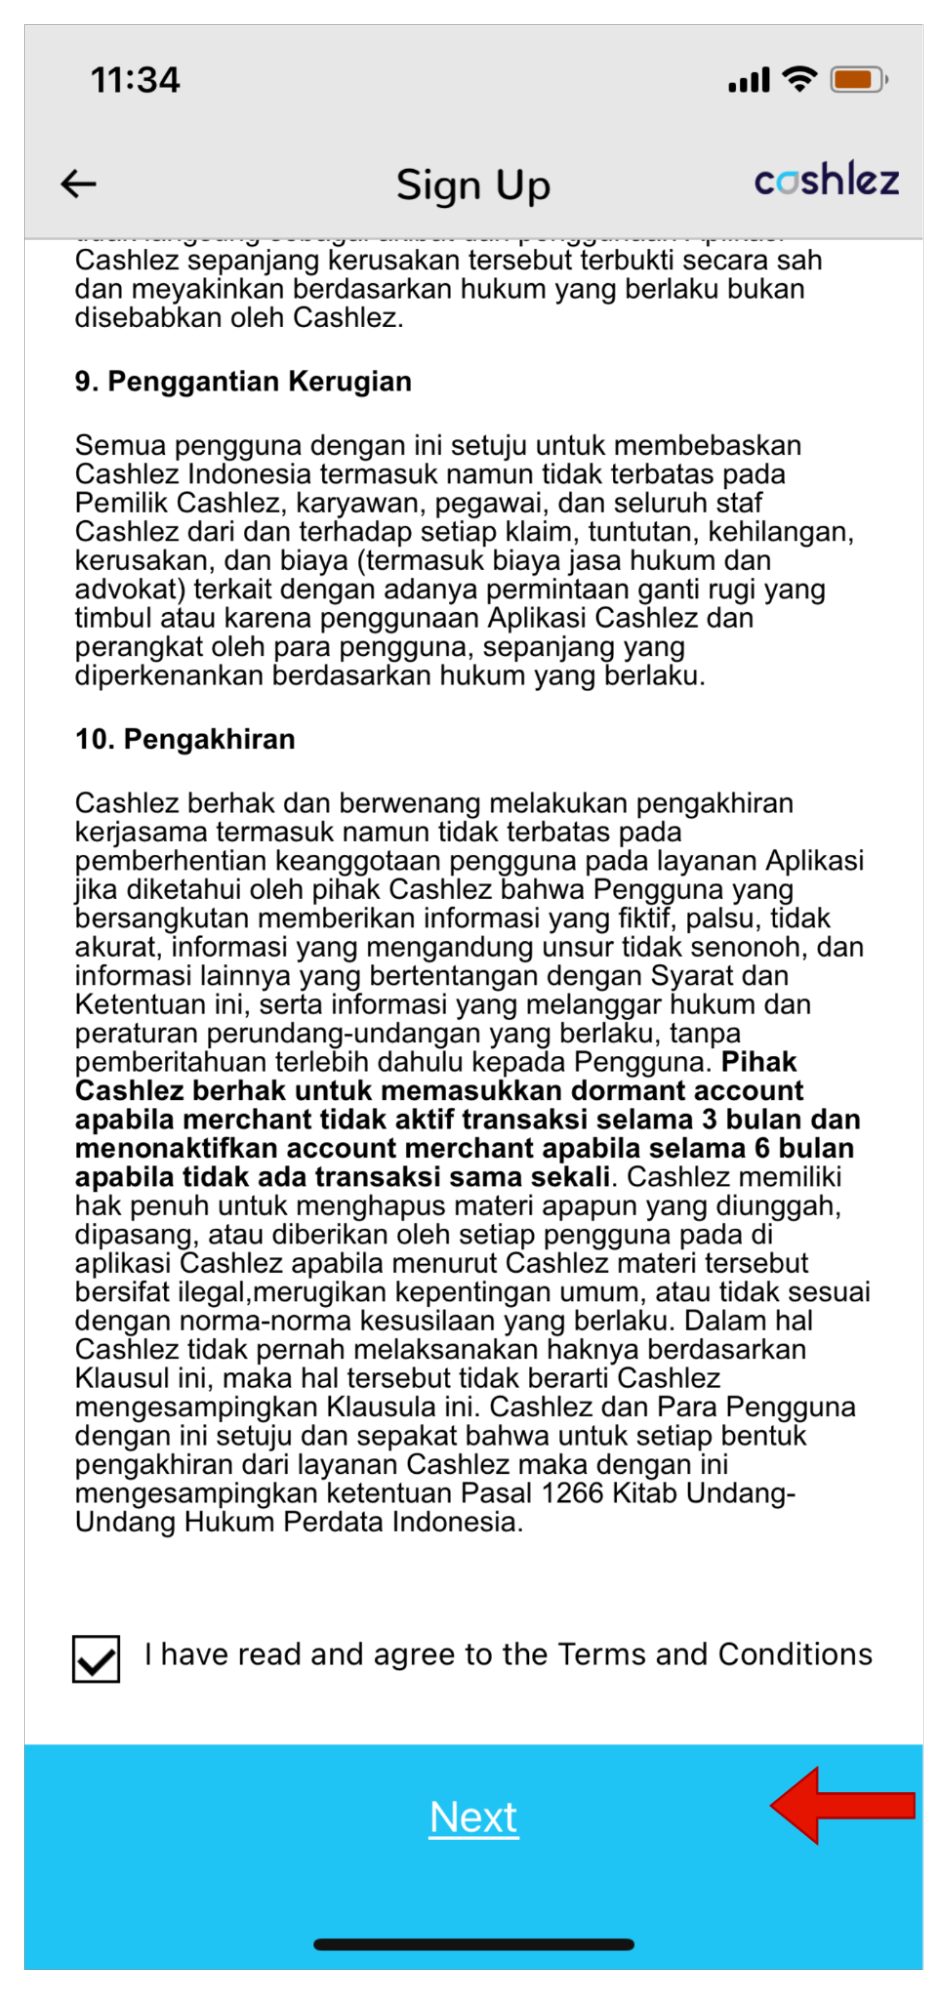
- Please read the applicable "Terms and Conditions", then if the user agrees, then click the checkbox then click the next button.

- Please fill out the short registration form attached for the next stage of becoming a Cashlez Merchant, then click the next button when you are finished.

- Users can choose 2 stages to get a verification code, namely via Whatsapp or SMS.
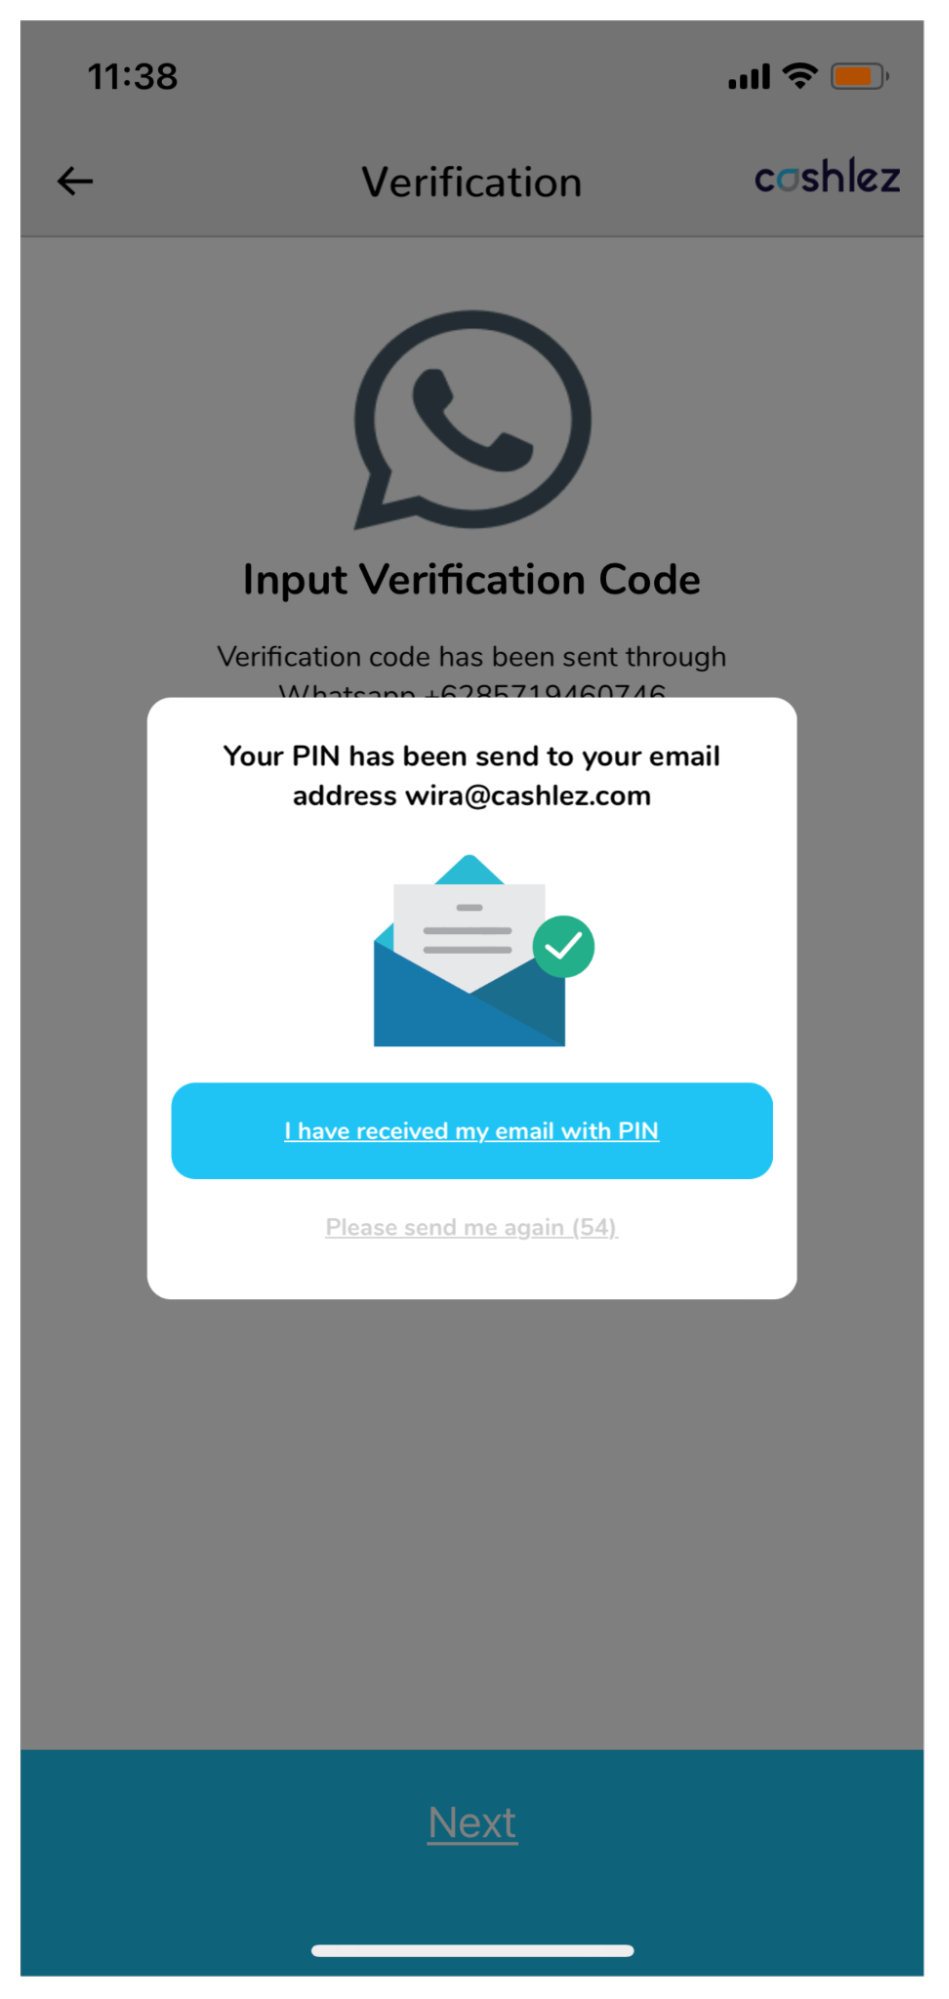
- After the user enters the verification code, a temporary PIN will be sent to the registered email.
After clicking the “I have received my email with PIN” button, the user will receive an email related to “Cashlez Login Information” and will be directed to the “Change PIN” page at the same time.

- Users can view the details of the “Cashlez Login Information” in the registered email.
All data related to Mobile User Login, Portal User Login and Portal Link (Android and IOS) are attached to the email.
Login
The following Login interface can be implemented on both Android and iOS systems.
- Click Cashlez application on the cellphone.

- Type Username (Username).
- Enter PIN.
Click masking pin if you want to see the PIN.
- Click the Log in button.
The access PIN is a 6-digit number.
- Click Forgot PIN to change the PIN.
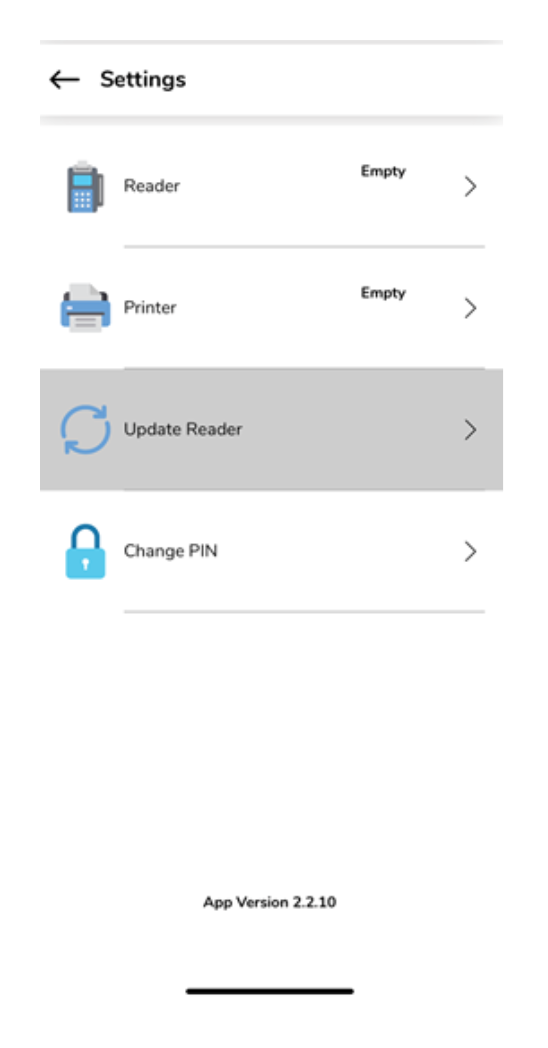
Change PIN
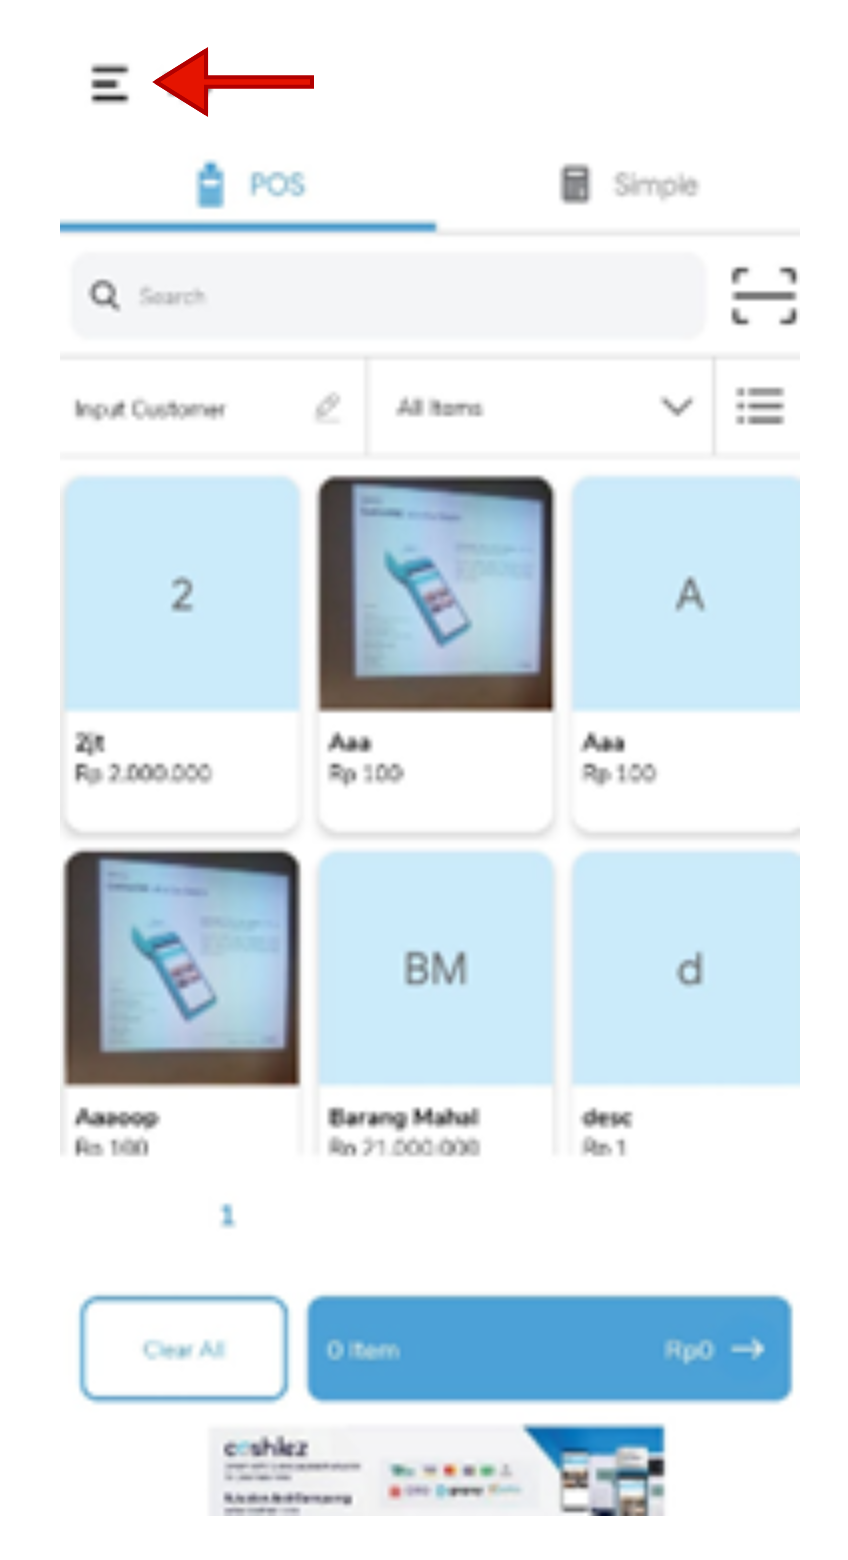
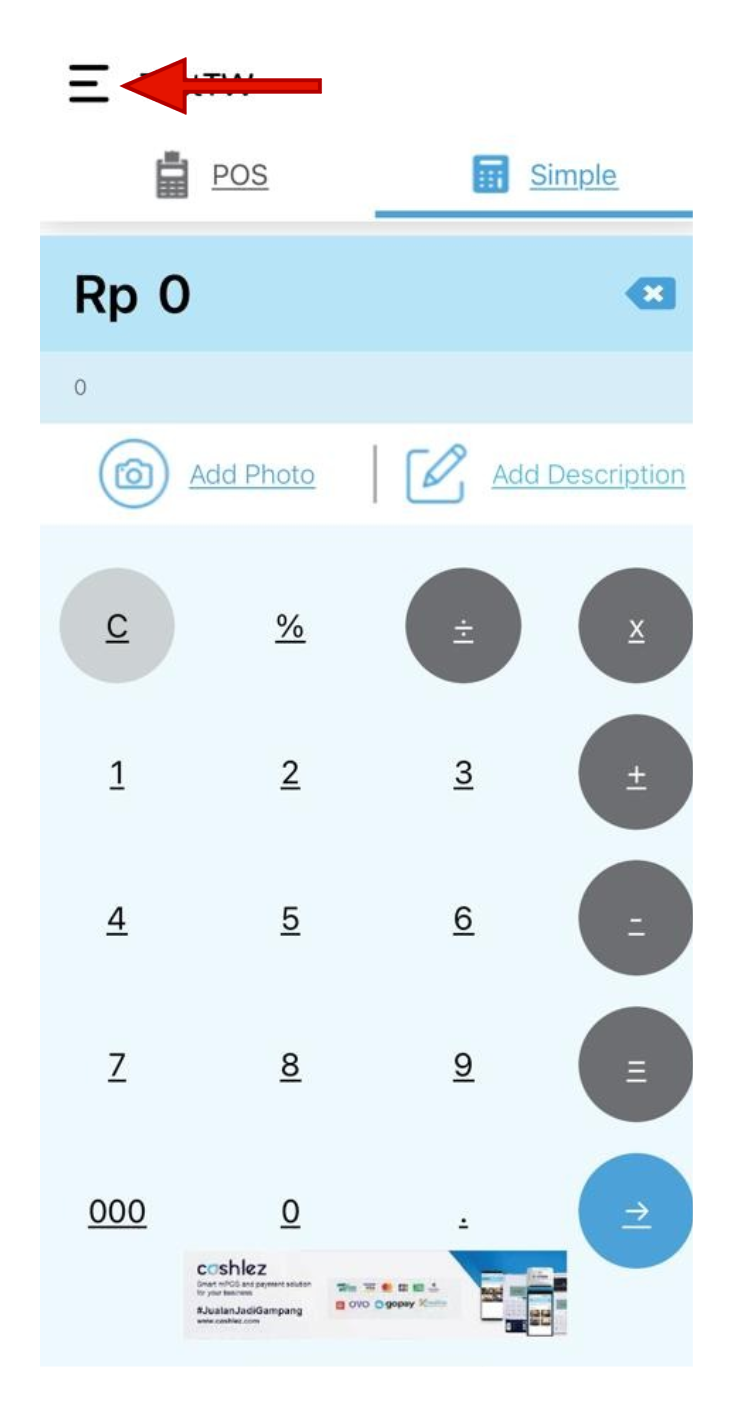
- Press Symbol ≡ then Click button Setting.
- Click Change PIN to change old PIN.
- Input old PIN.
- Input new PIN.
- Input new PIN to confirmation.
- Click Next to continue the PIN/Forgot Password reset process.


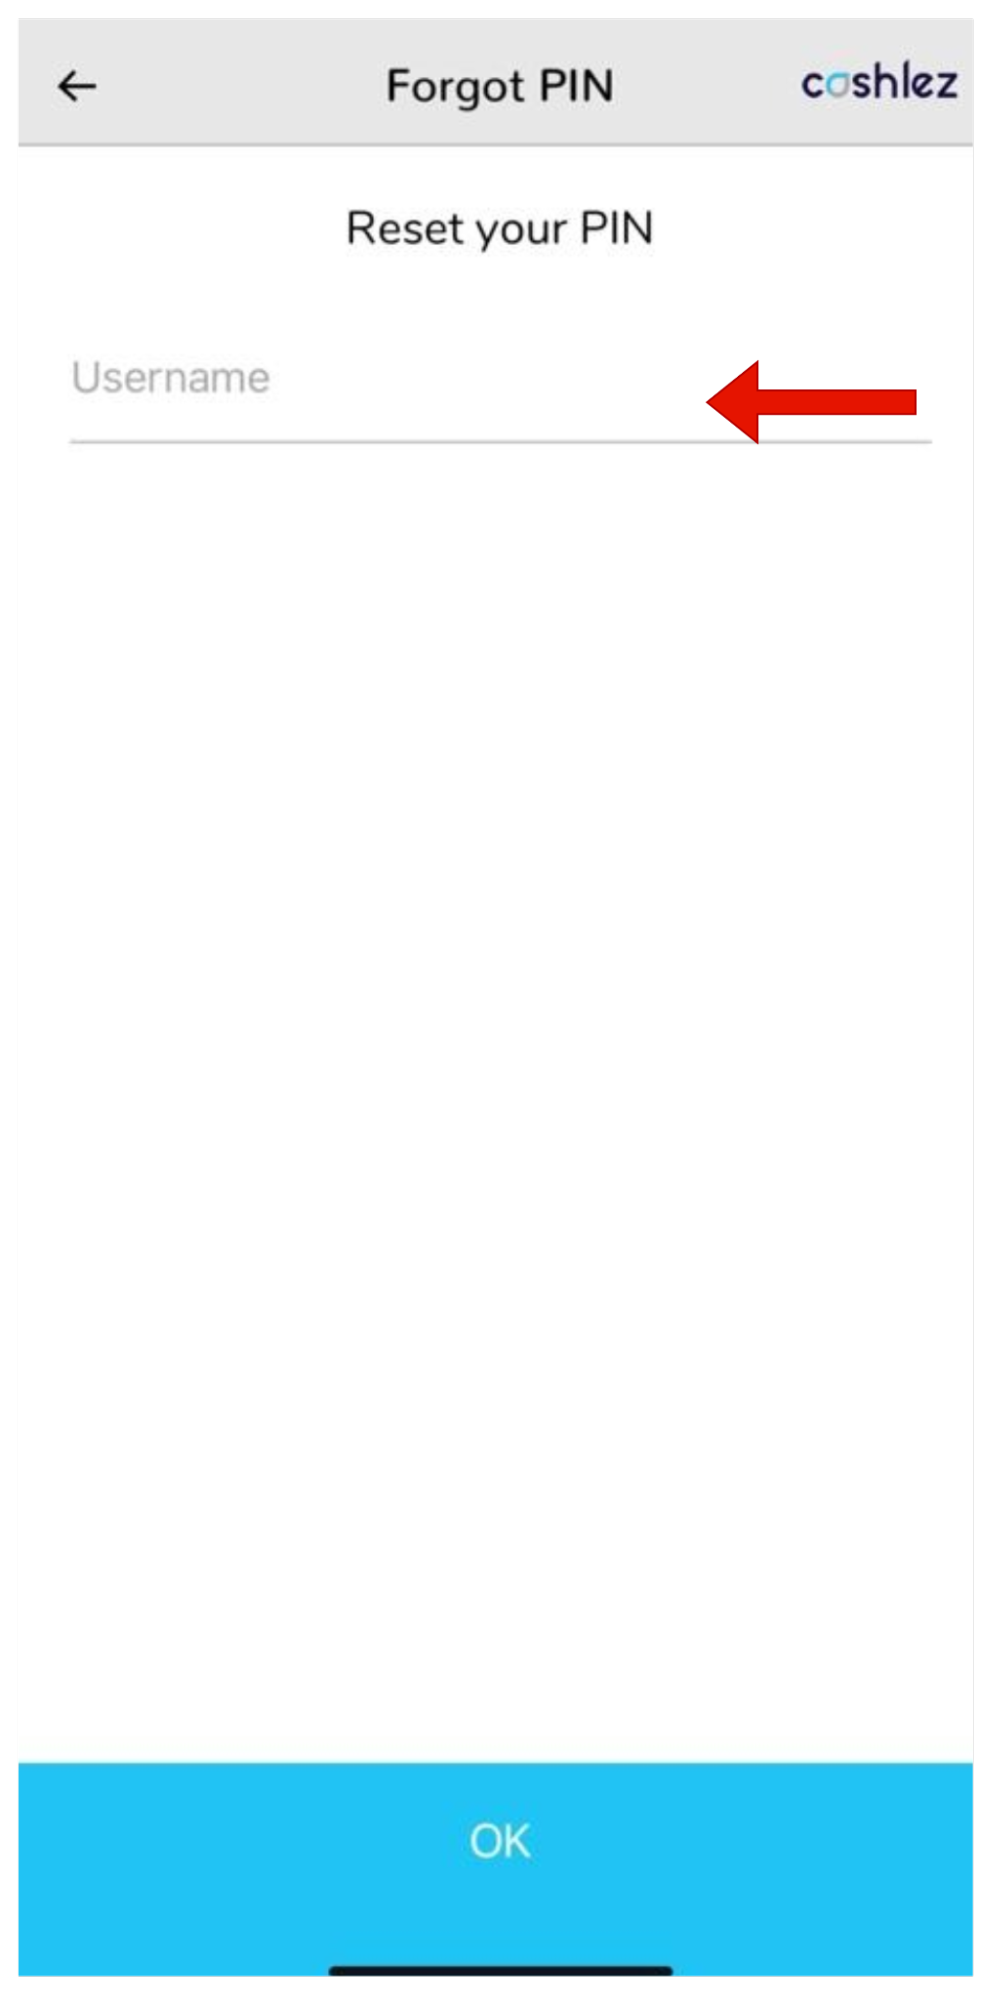
Forgot Password
- Click Forgot Password if the user forgets and wants to get a new PIN.
- Input Username.
- Click OK to continue the PIN reset/forgot password process.
- Enter the old PIN.
- Enter the new PIN.
- Enter the new PIN to confirm.
- Click Next to continue the PIN/Forgot Password reset process.


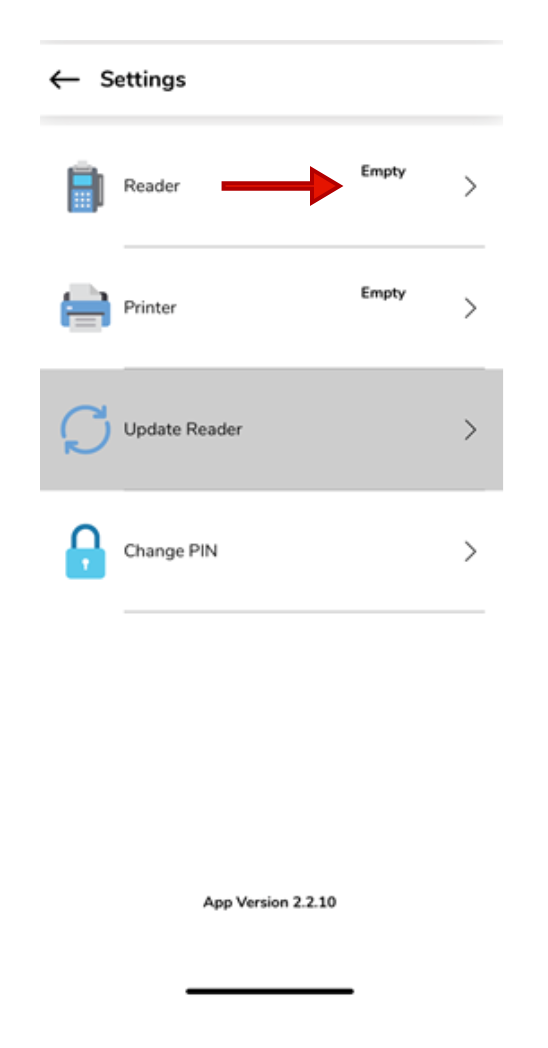
Pairing
- Choose menu Setting.
- Turn on the reader, then press the On/Off button.
- Select the bluetooth menu, then turn on bluetooth.
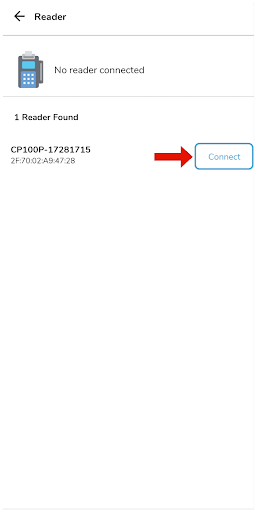
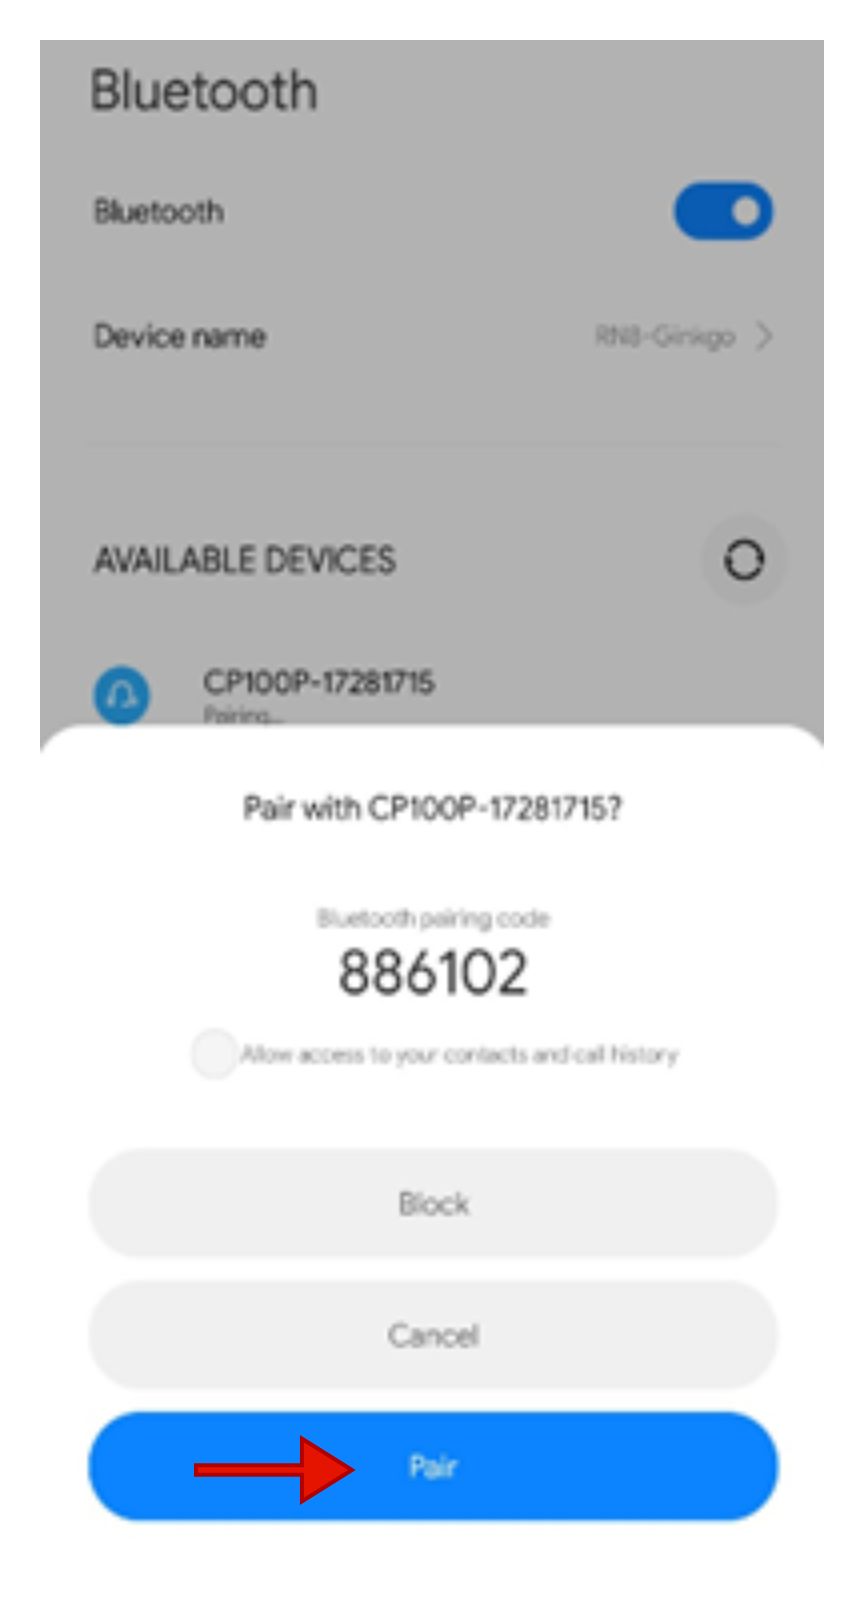
- Connect the reader and press the refresh button, recheck the reader ID that appears, if it is correct you can press connect (pairing).
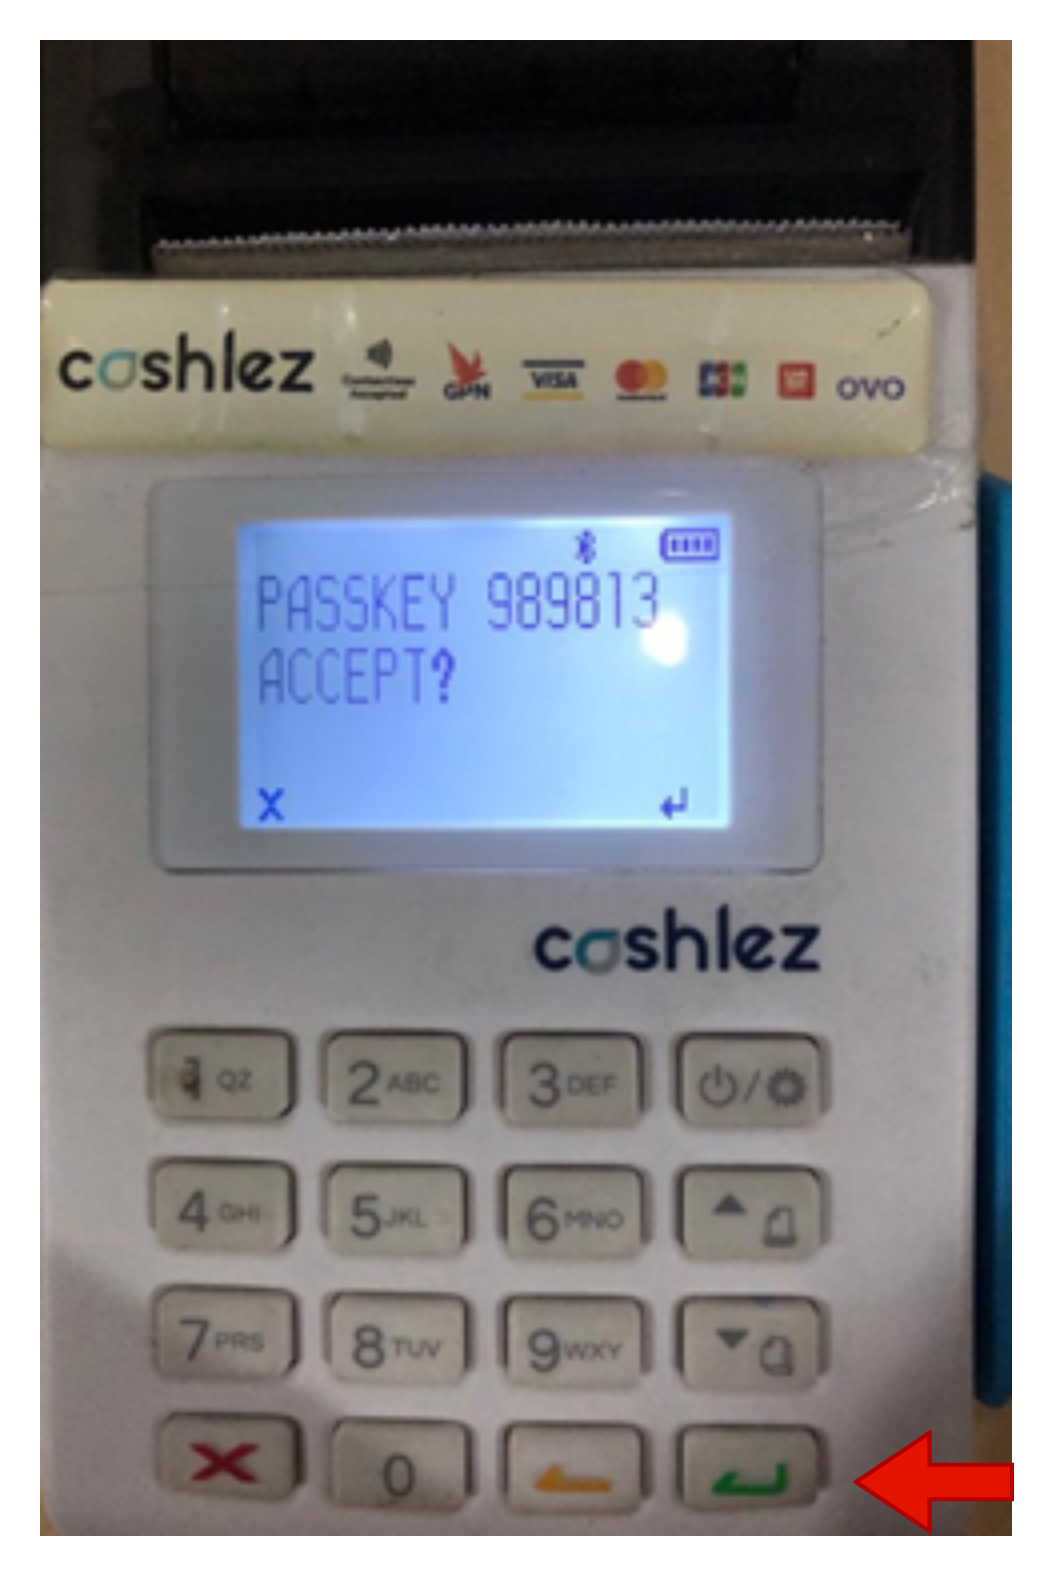
- Press Button Enter.
- Log in to the Cashlez App ,then select option ≡.
- Choose Setting.
- Press button On/Off.
- Choose Reader.
- Select button Refresh.
- Check again the ID reader that appears, if it is correct, then press the button connect.
- Select the pair button and immediately check on reader.
- Press Button Enter.
- If it is connected to the reader menu, the Reader ID will appear on the cellphone.
- Choose menu Setting.
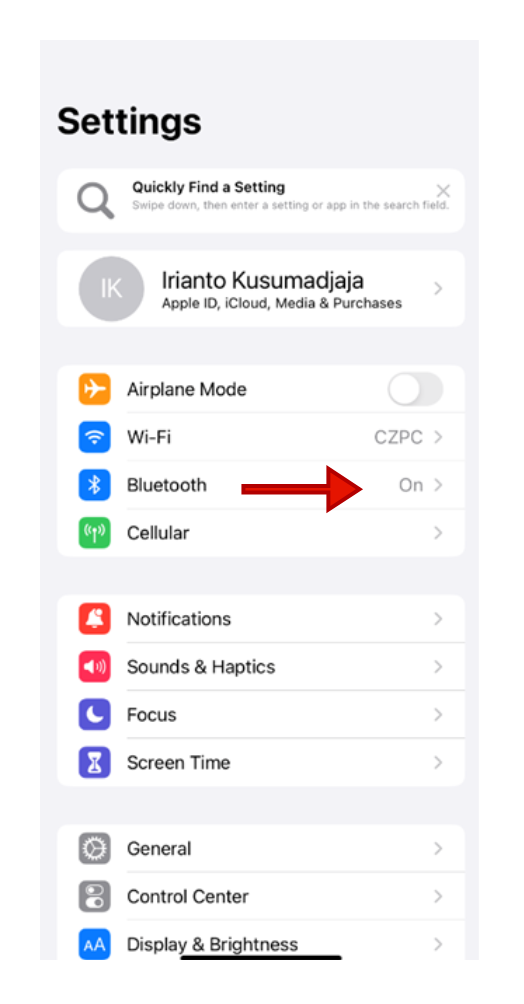
- Turn on bluetooth on the setting menu and activate the reader by holding the On/Off button.
- Click ID reader on the bluetooth page.
- Check the ID reader that appears, if correct, press the **Pair** button on the mobile phone, then presson the Reader
- Make sure the ID reader status is Connected.
- After logging in, a Bluetooth confirmation screen will appear, then press Settings.
- Turn on bluetooth.
- Press button On/Off.
- Check the reader ID that appears, if it is correct, press pair then press Enter on the reader.
- Go back to the Cashlez app, then press option ≡ button.
- Select Settings.
- Select Reader.
- Select Refresh.
- Press connect on the serial number of the connected reader and select OK, wait until it changes to unpair.
- if the user no longer wants to connect (pairing) the mobile phone and the reader, then click the Disconnect button.
Pairing Android Through The Mobile Settings Menu
Pairing Mobile (Android) with the reader Through the Mobile Settings Menu


After connecting the cellphone and reader, please check again on the reader and cellphone to make sure they are connected to each other.
Pairing Android Through the Cashlez Application
Pairing Handphone (Android) with Reader Through the Cashlez Application


Pairing iOS through Mobile Setting Menu
Pairing (iOS) with the reader Through the Mobile Settings Menu


Pairing iOS Through The Cashlez Application
Pairing Handphone (iOS) with the reader Through the Cashlez Application.


Payment Transaction
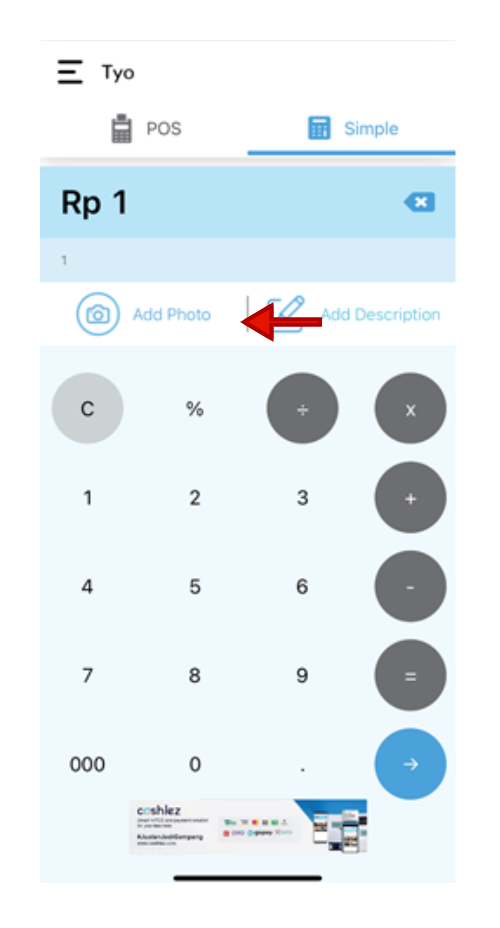
- Enter the transaction nominal on the cellphone, then click the button ➡️.
- Click add description to add a description to the transaction (optionally).
- Press Add Photo to add a photo to the transaction (optionally).
- Click Input Customer to provide information about the buyer's contact.
- Click All Items to open the Category section.
- Click Icon [-] to scan QR Barcode.
- Click Clear All to clear all filters.
- Click Items to process the payment.
- Enter the name of the buyer in the Name field.
- Enter the Mobile Number in the Phone section.
- Enter the Buyer's Email in the Email section.
- Then after everything is filled in, please click the Input Customer button.
- Category at the time of clicking the section All Items.
- Scan QR Code/Barcode
- Ask the merchant to choose an available payment method, choose between Debit/Credit card.
- Please dip/swipe the card.
- If it's a Chip Card, insert the merchant card into the reader (at the bottom of the card reader).
- If payment selects PIN, ask the merchant to enter the PIN on the reader device, then select the button Enter.
- If payment select Signature/Signature press the button Enter 1 time until the card reader screen appears BY PASS PIN, press the button Enter, ask the merchant to sign on the cellphone.
- Select agree.
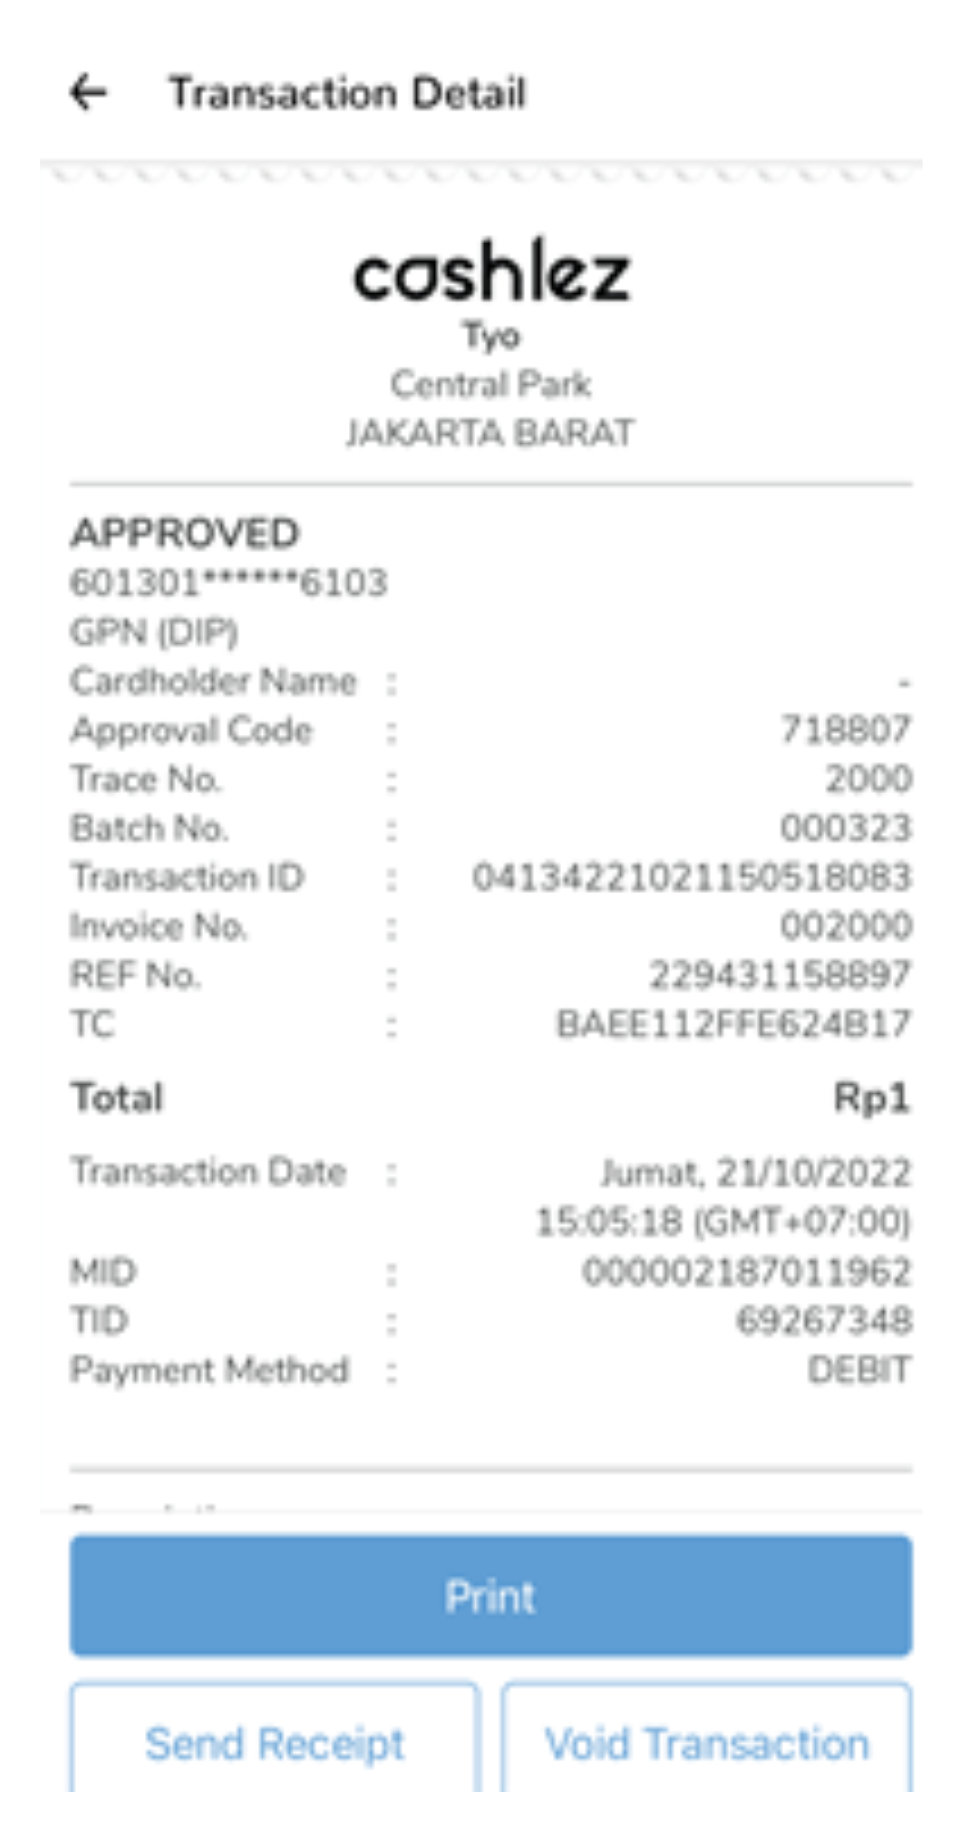
- If successful, the transaction is directed to the transaction receipt menu.
- If the transaction is successful, the mobile device will immediately display the Transaction Detail.
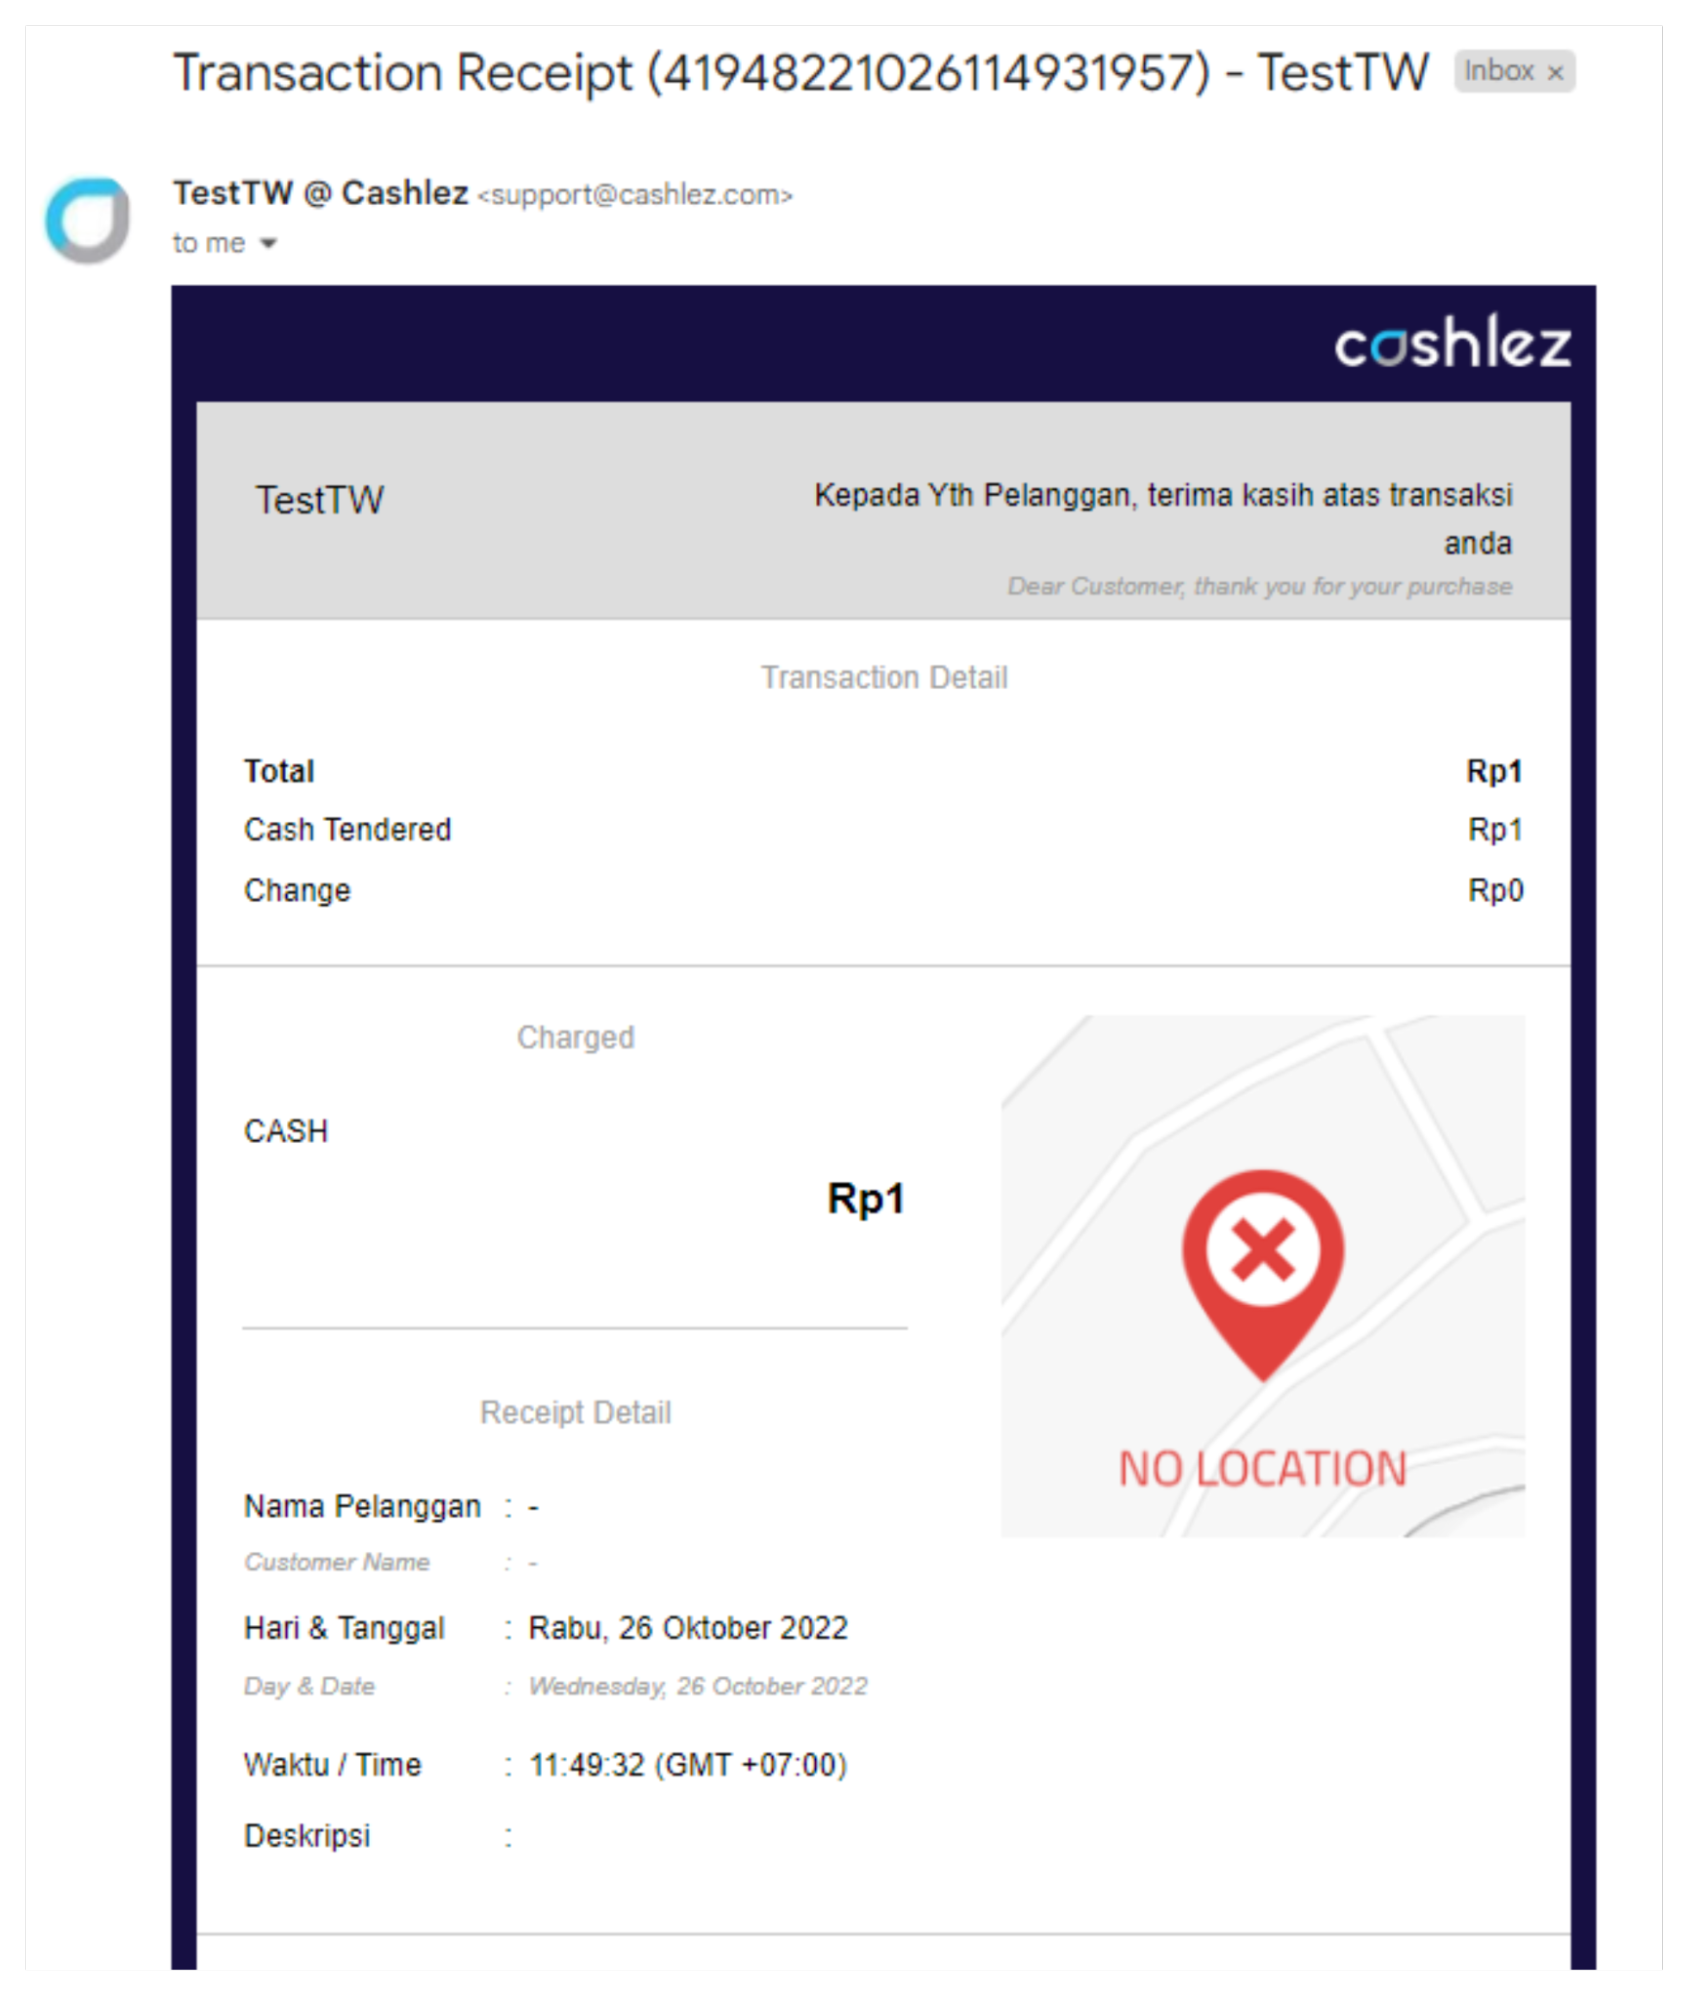
- Enter the email address you want to go to and click the box if you don't want to include the location of the transaction (*optional), then click the send button.
- If the transaction proof delivery process has been successful, a pop up notification will appear on the cellphone, then click the OK button to go to the next step.
- Details of proof of transaction have been sent to email.
- Click Transaction History to see details of payments that have already been made.
- If you want to search for a specific transaction, click the 🔍 sign on the top right. Users can search for transactions based on: Transaction ID, Merchant Transaction ID, Verification Code, and Transaction Date.
- Click the Category Dropdown and select one, then click Search.
- Click Bill to see the bill section.
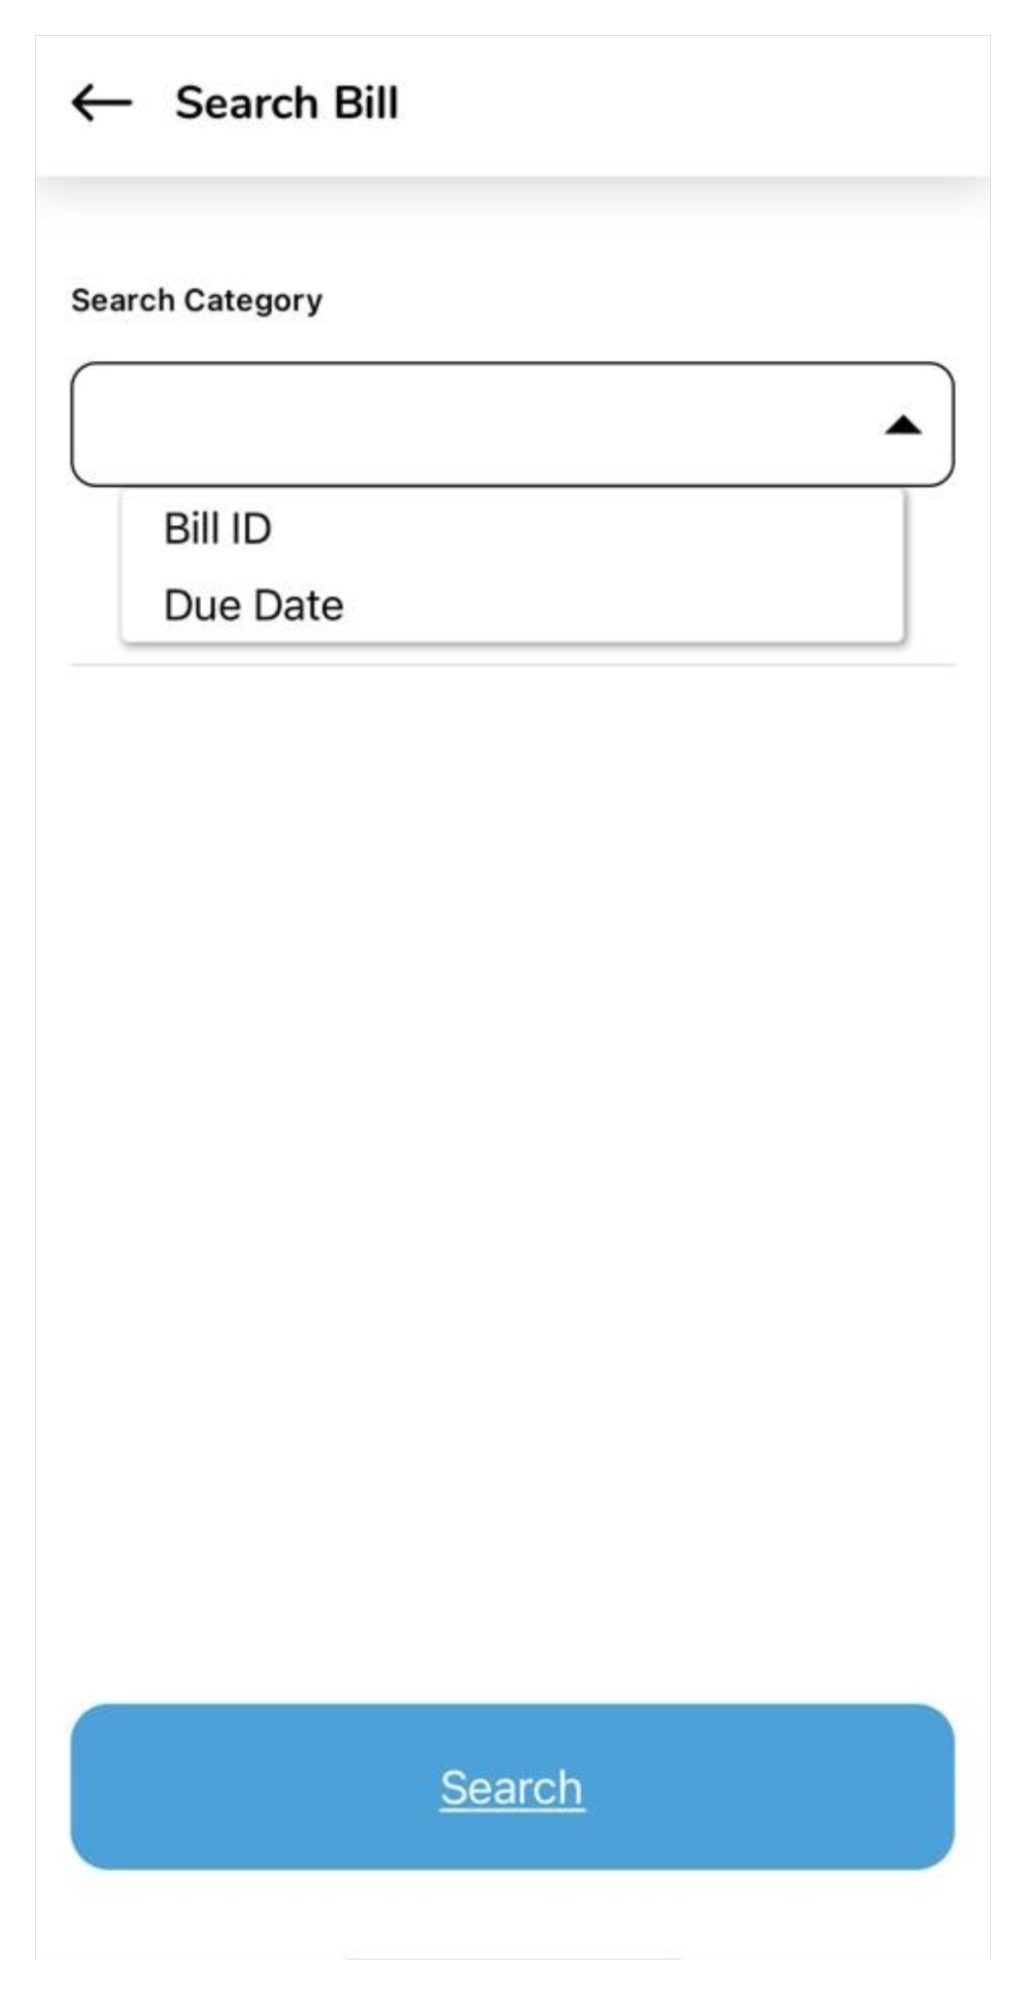
- If you want to search for a specific transaction, click the 🔍 sign on the top right. Users can search for bills based on: Bill ID or Due Date.
- Click the Category Dropdown and select one, then click Search.
- Click Settle Transaction.
- Click Input Username..
- Input Password.
- Click button Confirm to send information Settle Transaction.
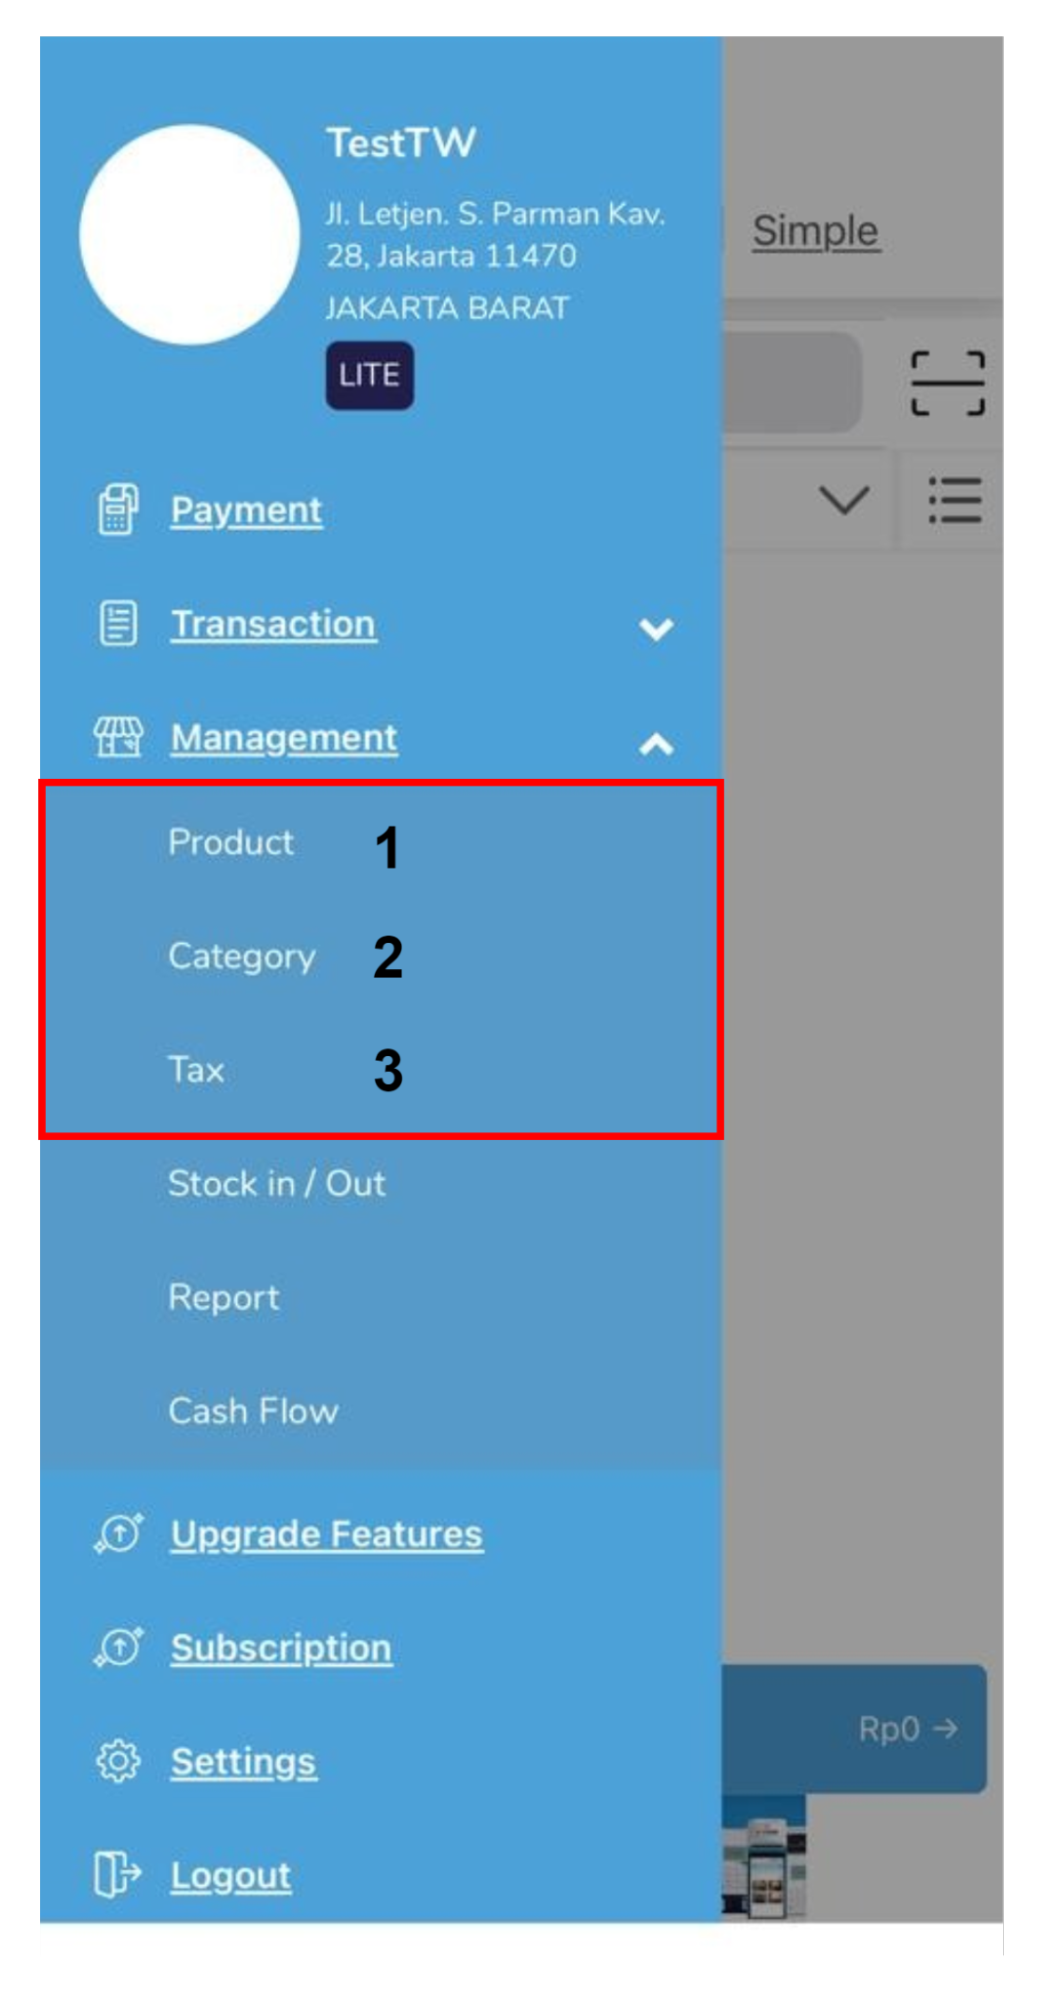
- Product to see all products sold.
- Category to view products by selecting available categories.
- Tax to give tax from the merchant to the buyer when buying a product.
- Stock in/out to see the merchant's stock in and stock out.
- Report to see the merchant report.
- Cash Flow to see the merchant's cash flow.
- Log in to the Cashlez Application, then select option ≡.
- Click Upgrade Features.
- Click OK to next step registration process.
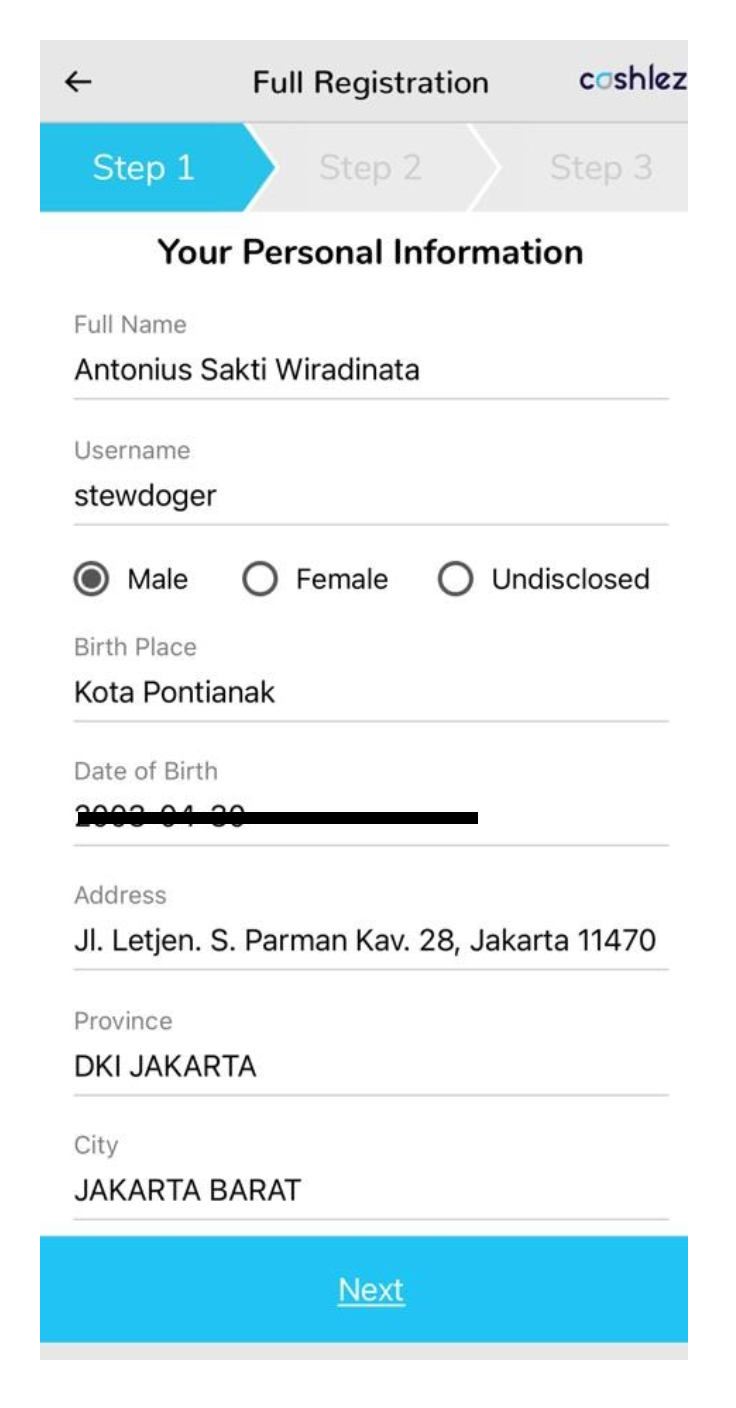
- Fill in the personal data in Step 1 that has already been registered during the sign up process to continue registering as a merchant so that you can make transactions.
- Upload ID Photo.
- Upload Selfie Photo With ID
- Upload NPWP.
- Please fill in the Company Information in step 2 to complete the registration so that you can make the payment as a merchant.
- Please upload Product Photos.
- Please upload Business Location.
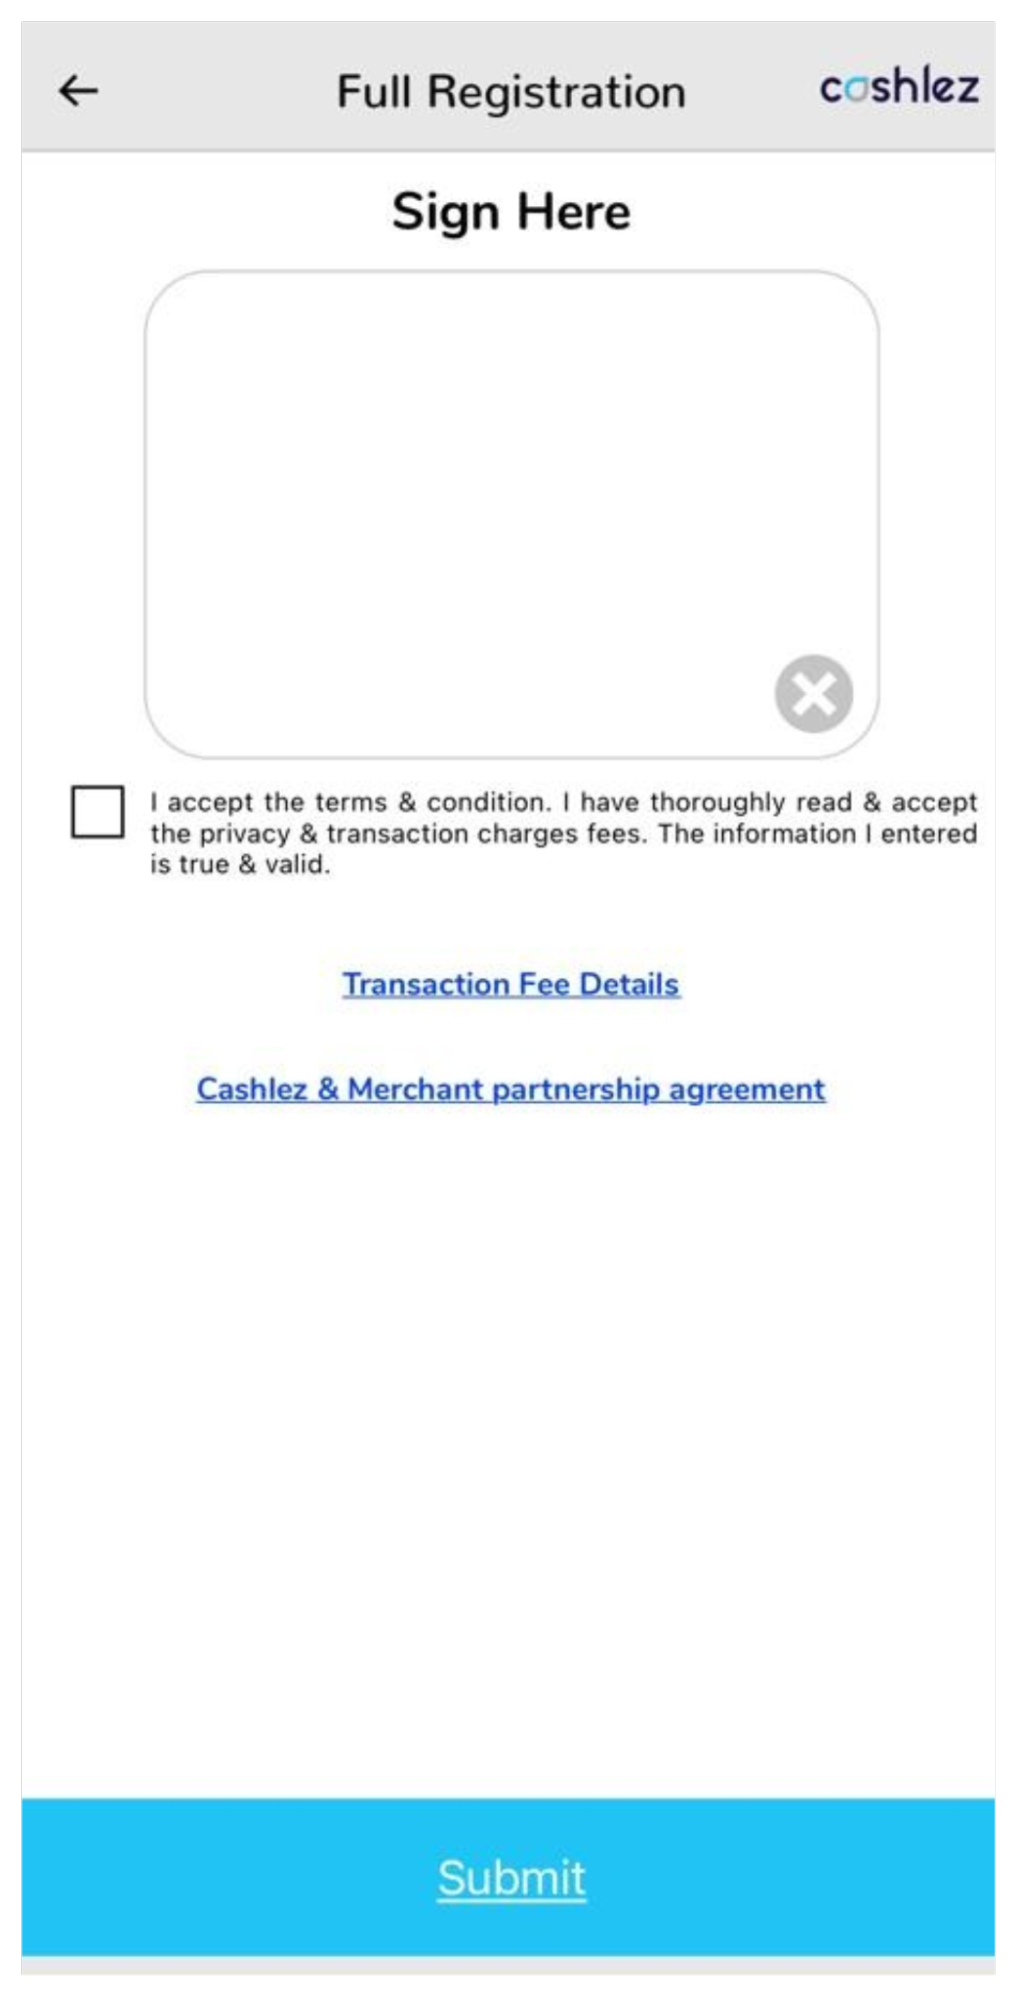
- Please fill in the Bank Account Information in the 3rd/last step to complete the registration so that you can make payments as a merchant.
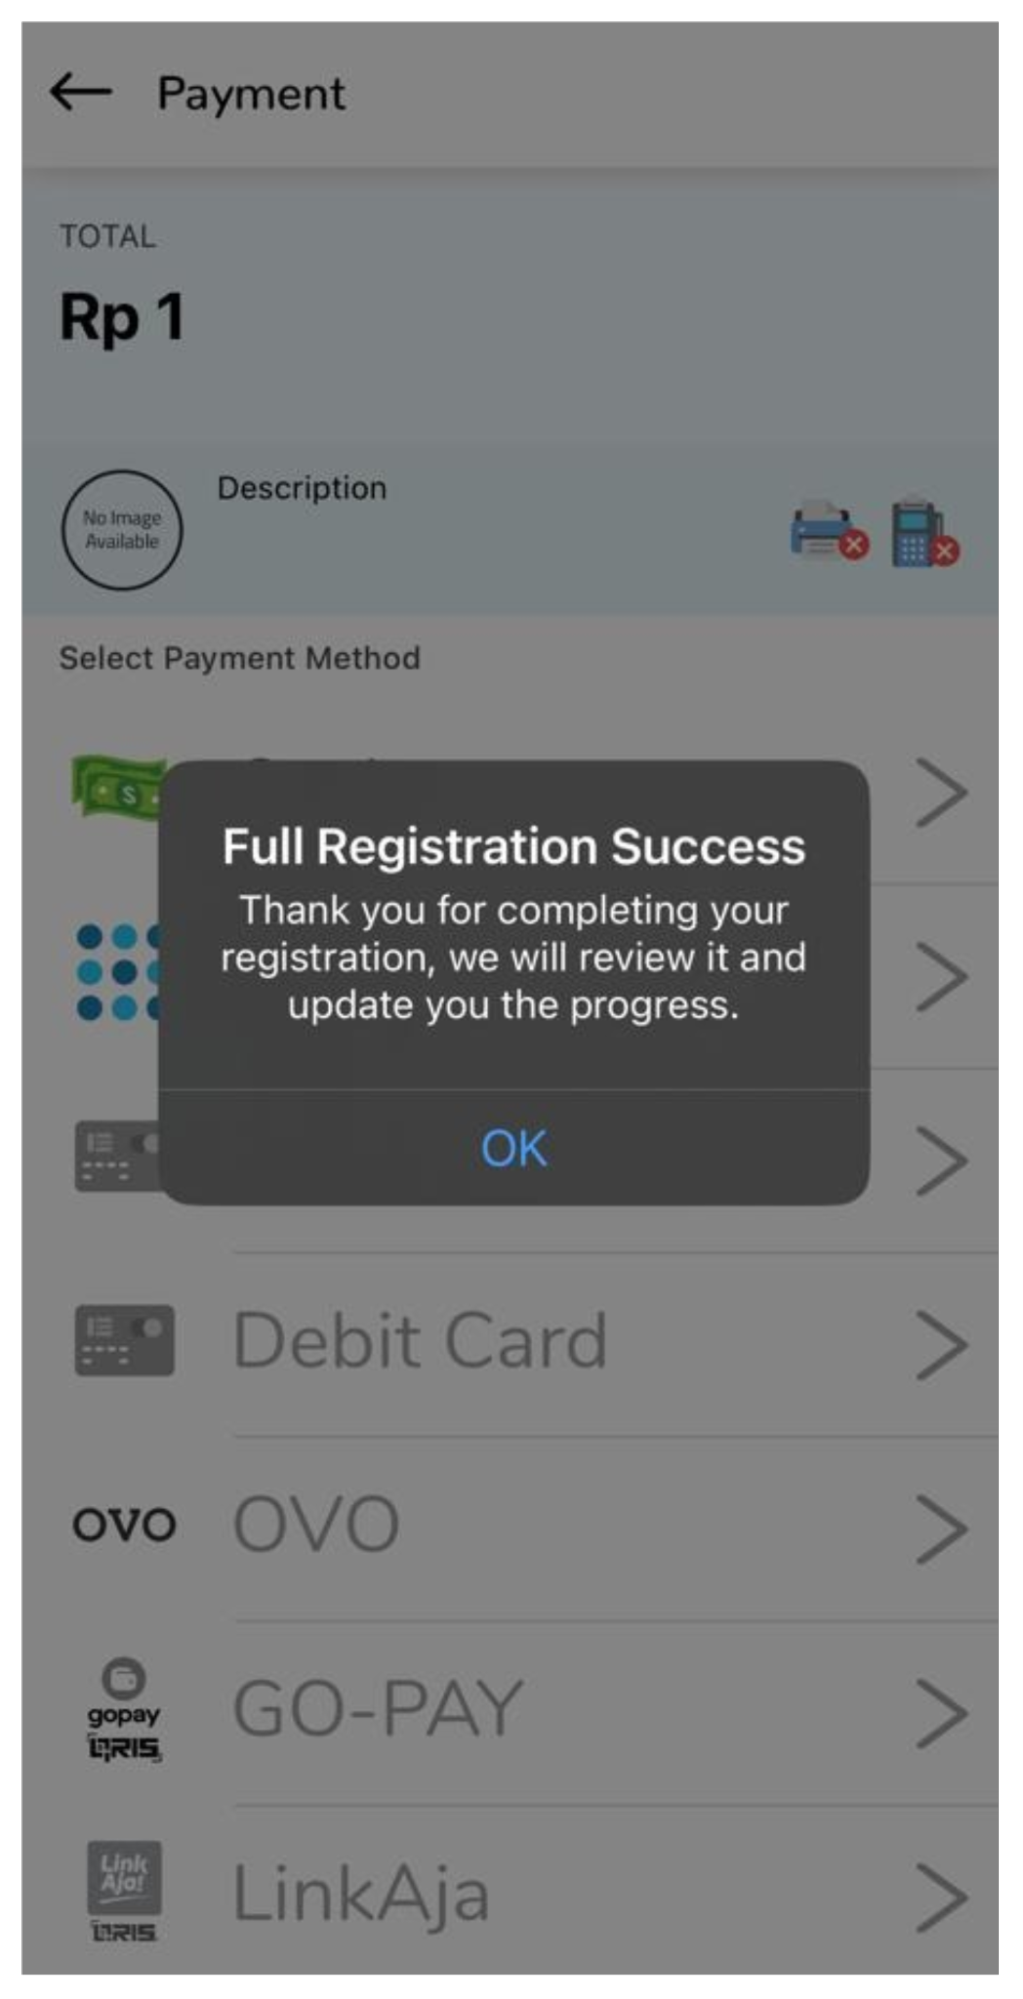
- Please sign the Sign Here provided, then if the user agrees, please check the consent box, then click the submit button.
- The "Full Registration Success" notification will appear after clicking the submit button in Step 3. Please wait for the revision from the developer team.
- Log in to the Cashlez Application, then select an option ≡.
- Click Upgrade Features.
- In the Upgrade Features menu, users can choose several payment options.
- Click the Request Payment Option Dropdown if the user wants to select Installment.
- Insert request note (*optional).
- Click button Submit.
- In the Upgrade Features menu, users can choose several payment options.
- Click the Request Payment Option dropdown if the user wants to select LinkAja.
- Insert request note (*optional).
- Click button Submit.
- In the Upgrade Features menu, users can choose several payment options.
- Click the Request Payment Option dropdown if the user wants to select OVO.
- Insert request note (*optional).
- Click button Submit.
- In the Upgrade Features menu, users can choose several payment options.
- Click the Request Payment Option dropdown if the user wants to select ShopeePay.
- Insert request note (*optional).
- Click button Submit.
- In the Upgrade Features menu, users can choose several payment options.
- Click the Request Payment Option dropdown if the user wants to select OCTO Mobile.
- Insert request note (*optional).
- Click button Submit.
Normal Payment
Transaction (Simple)


Transaction (POS)


Payment Via CC/Debit
Especially for non-chip cards, they are no longer used for regulation in Indonesia.
If payment selects Signature/Signature press the button 1 time until the card reader screen appears BY PASS PIN, press the button, ask the merchant to sign on the cellphone. Select agree.
Transaction Detail


Transaction Menu


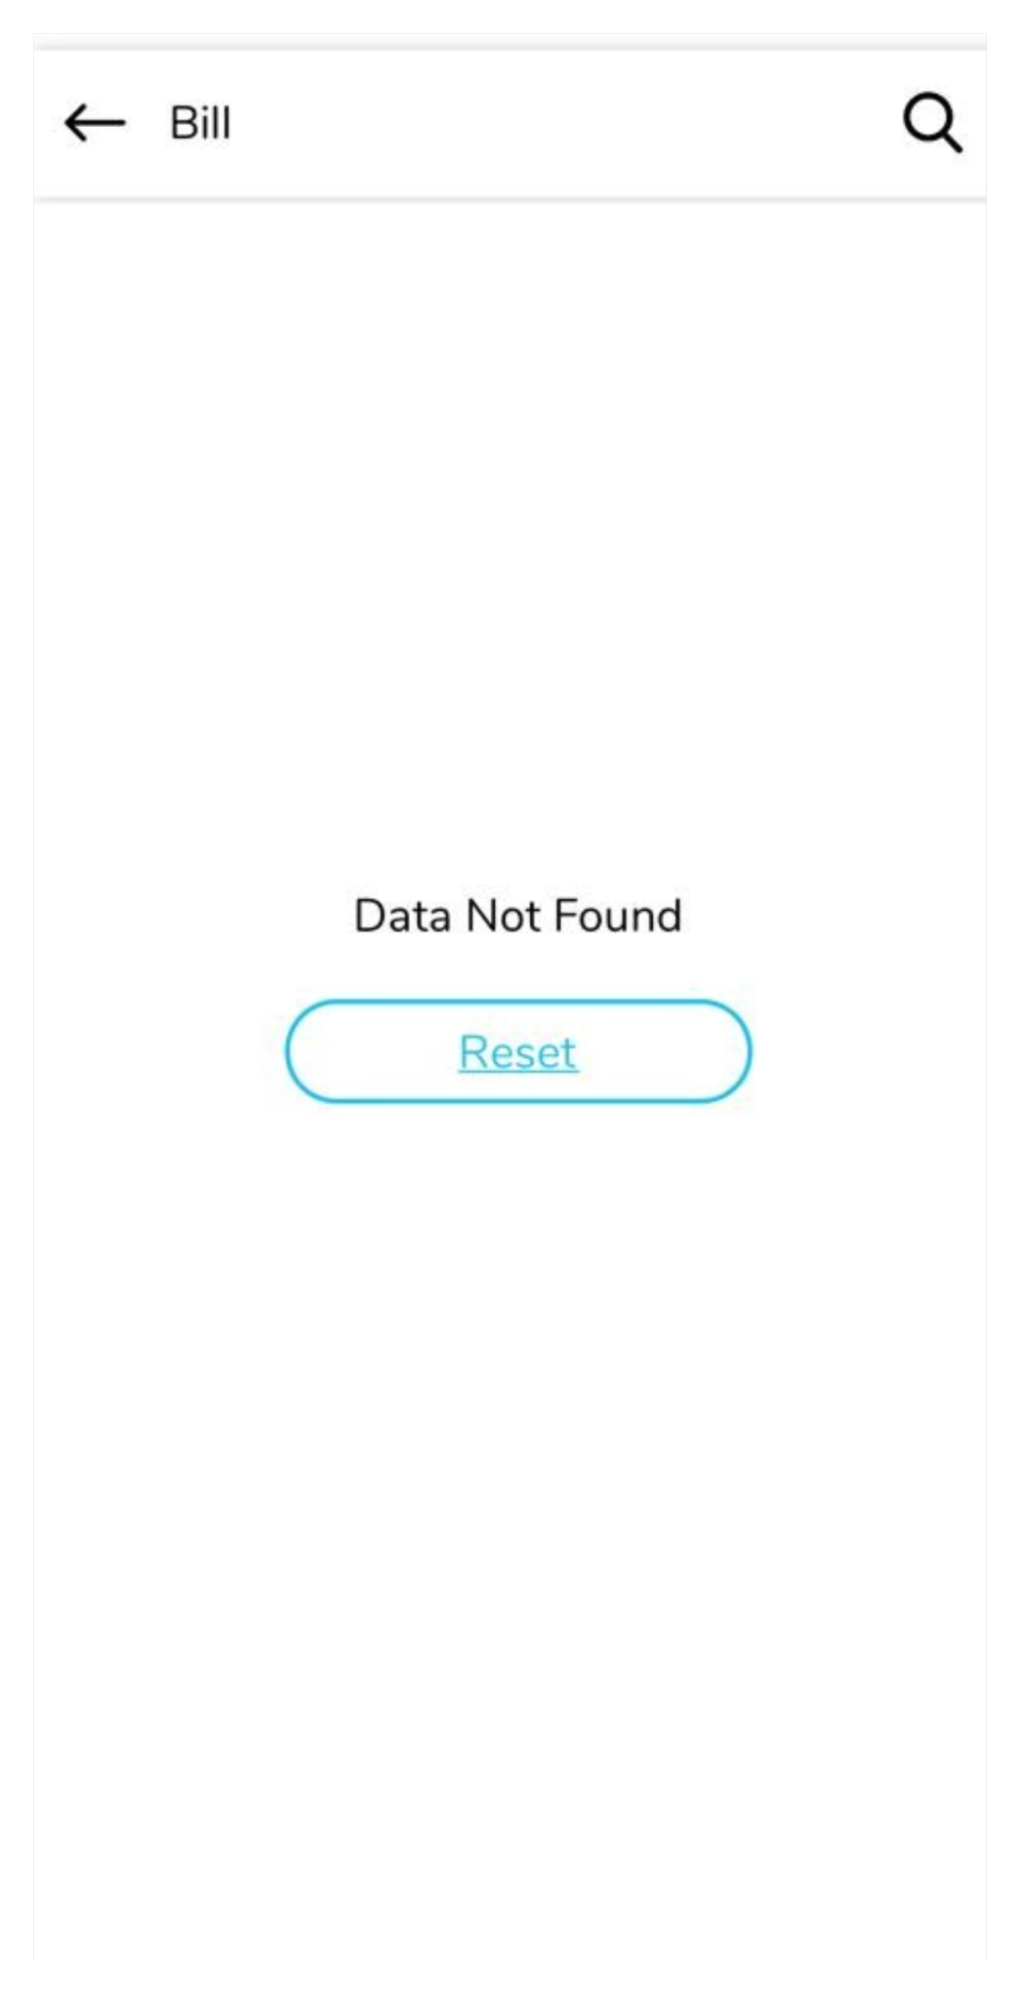
Click the Reset button to refresh the Bill data.


Management Menu
Pre-Subscription
In the red box, merchants can use this feature without the need for a subscription.
Subscription

The next red box is an optional option because the merchant must do a subscription to open this feature.
Upgrade Features
Pre-Registration


Registration Features

This feature will enable you to use installment payment option. With this feature, customer will be able to pay by installment with Mandiri & BNI Credit Card.

This feature will enable you to use LinkAja Payment option.

This feature will enable you to use OVO Payment option.

This feature will enable you to use ShopeePay Payment option.
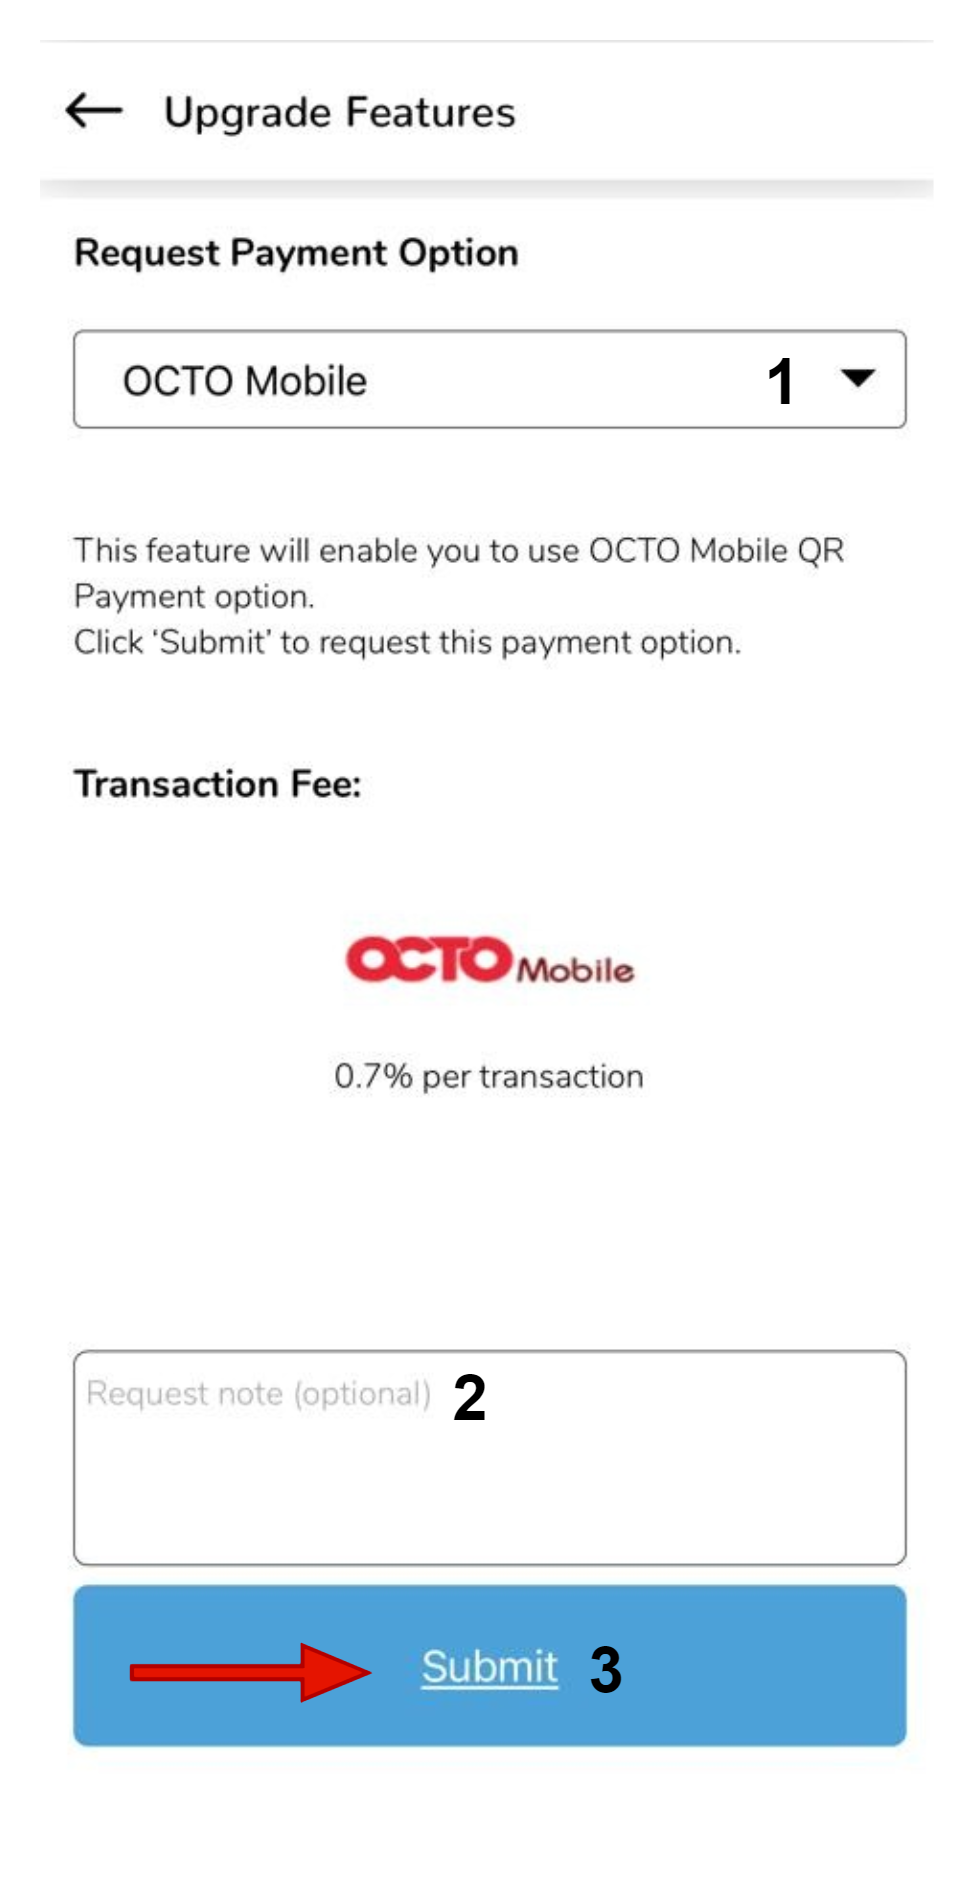
This feature will enable you to use OCTO Mobile Payment option.