Merchant OnBoarding Manual Guide
1. Create Account

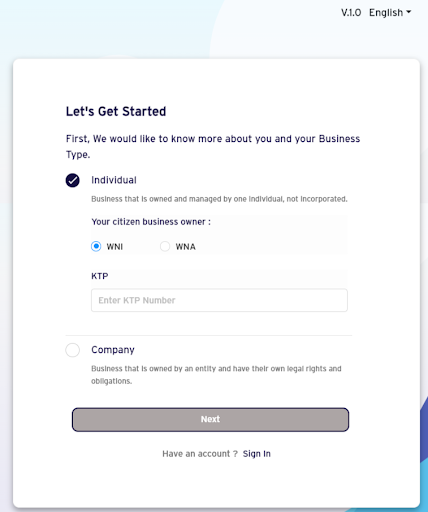
Merchant on Boarding Portal is available on both mobile and website. For better view merchants could access from the website browser. However, there are two business types of registration, such as Individual Registration and Company Registration.

- Type the reference url link of Merchant on Boarding on the browser Merchant On Boarding Website
- Choose between individual or company by clicking on the radio button on the screen.
- Then, click next button.
- Click Individual radio button on the screen if the user's business type is owned by a micro small business.
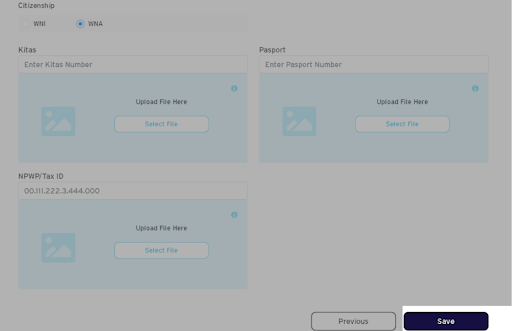
- Choose your citizen business owner (WNI/WNA)
- Enter KTP Number for WNI and Passport Number for WNA
- Then, click next button.
- Fill in Full Name inside the box.
- Insert email, then click the verify button.
- Insert OTP number from email, then click enter button.
- Then, click next button.
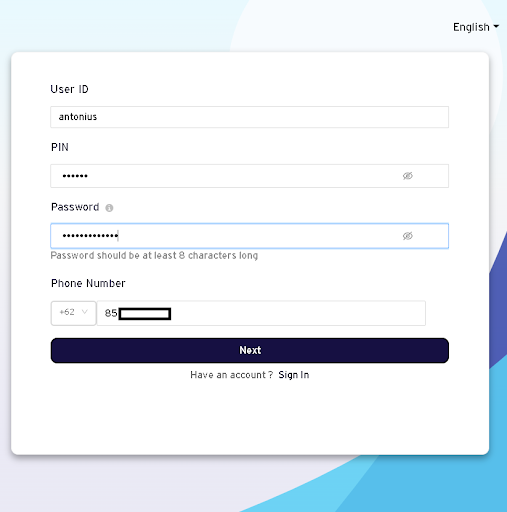
- Insert User ID.
- Insert PIN.
- Insert Password.
- Insert Phone Number.
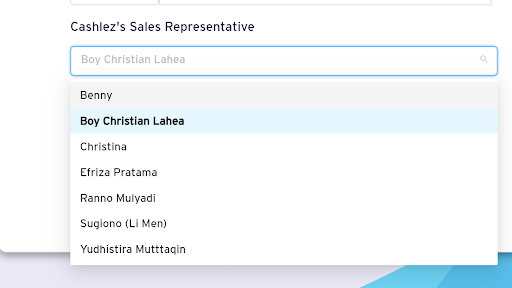
- Choose a Cashlez's Sales Representative.
- Then, click Next button.
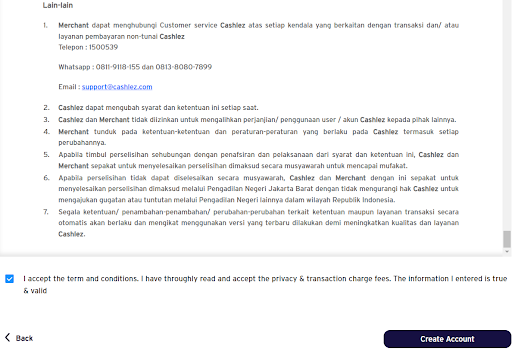
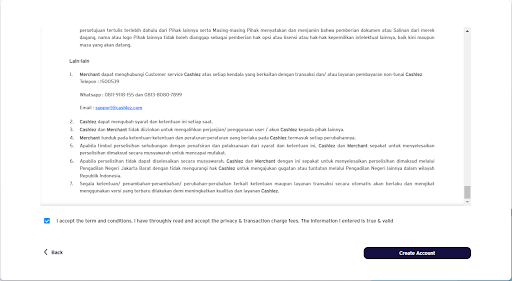
- Merchant should read the terms and conditions before deciding to create the account.
- Click Check box button if the merchant has done reading the terms and conditions page.
- Click Create Account to the next step.
- The Account has been created, the page automatically will be directed to the login page.
- Merchant will get a credential email as confirmation of success registration.
1.1 Individual
Individual Registration is for businesses that are owned by an individual entity and have their own legal rights and obligations.


Click Resend button if the user wants to get the new OTP again.
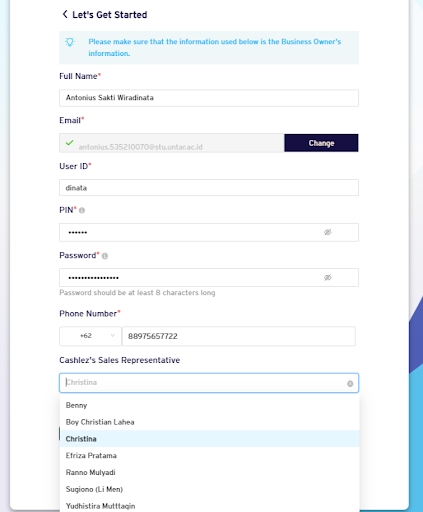
Click the masking lable to unhide the PIN number (only numeric character).
Input password at least one uppercase, one special character, and one number
Click the masking lable to unhide the password.


Pop up verification notification will be displayed, then the user can choose the verification code method to be sent (between Whatsapp or SMS).

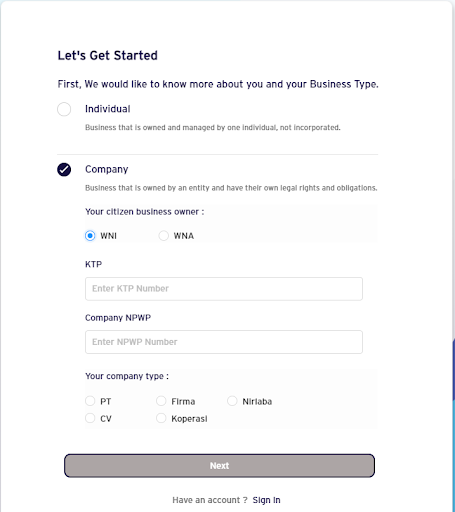
- Click Company radio button on the screen if the merchant has a legal entity.
- Choose your citizen business Owner (WNI/WNA).
- enter KTP number and NPWP number for WNI or enter Passport number and NPWP number for WNA.
- Choose the company type between PT, Firma, Nirlaba, CV or Koperasi.
- Then, click Next button.
- Fill in Full Name inside the box.
- Insert Email, then click the Verify button.
- Insert OTP number, then click Enter button.
- Click Resend button if the user wants to get the new OTP again.
- Then Click Next Button
- Insert User ID.
- Insert PIN.
- Insert Password.
- Insert Phone Number.
- Insert Insert Cashlez's Sales Representative.
- Then, click Next button.
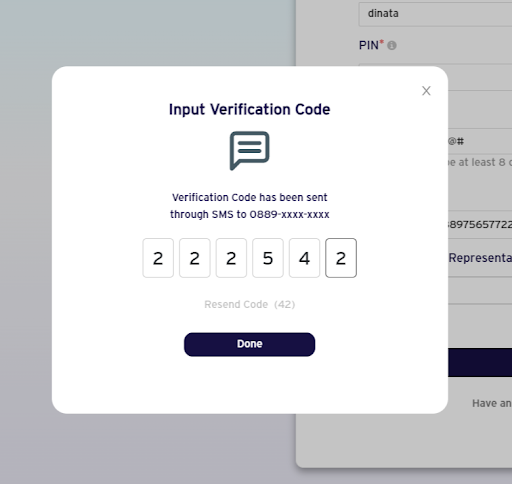
- Input OTP number given.
- Then, click Done button.
- Merchant should read the terms and conditions before deciding to create the account.
- Click Check box button if the merchant has done reading the terms and conditions page.
- Click Create Account to the next step.
- The Account has been created, the page automatically will be directed to the login page.
- Merchant will get a credential email as confirmation of success registration.
1.2 Company
Company Registration is for businesses that are owned by a company entity and have their own legal rights and obligations.


Click the masking button to unhide the PIN number (only numeric character).
input password at least one uppercase, one special character, and one number
Click the masking button to unhide the password number (input password at least one uppercase, one special character, and one number).
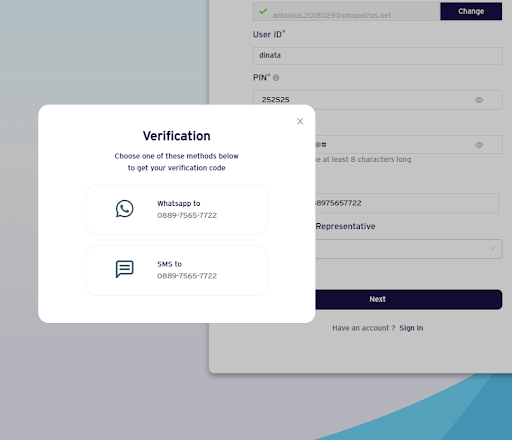
Pop up verification notification will be displayed, then merchant can choose the verification code method to be sent (between Whatsapp or SMS).


2. Login

- Fill in User Id.
- Enter PIN or Password.
Click the masking button to unhide the PIN or Password
- Then, click Login button.
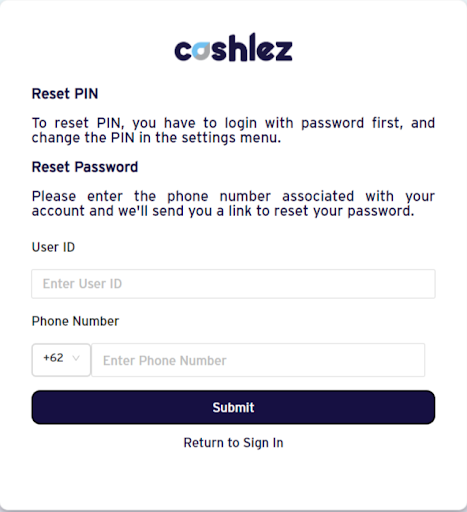
- Insert User ID.
- Insert Phone Number.
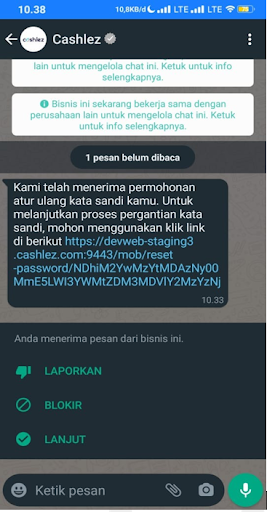
- Notification was sent from Whatsapp, Then Click the link to Create a new Password.
- Input New Password.
- Re-enter the New Password to Confirm Password.
- Then, Click Update Password To save Password.
2.1 Reset PIN/Forgot Password
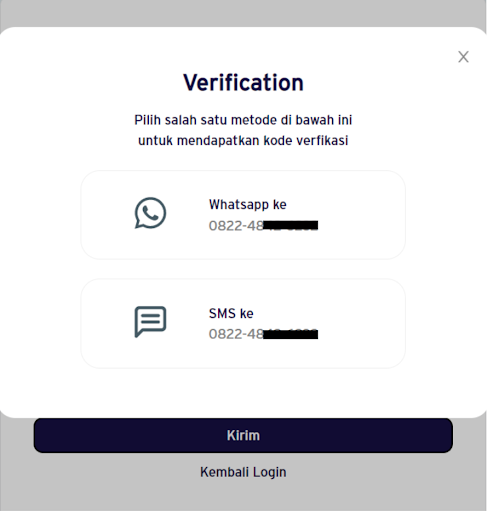
Pop up verification notification will be displayed, then the user can choose the verification code method to be sent (between Whatsapp or SMS).


3. Documentation Required
Document required will follow the selected payment feature of the merchant.

| Logo | Description |
|---|---|
 | No Data Submitted, status unverified |
 | Data has been submitted, status unverified by ops |
 | Data verified by ops |
 | Data Requires Fix |
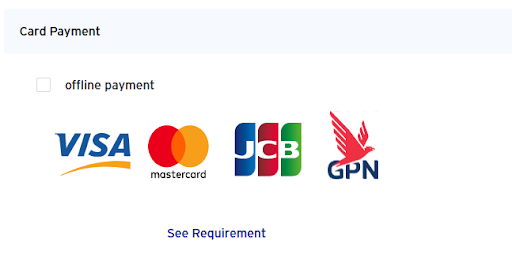
- Card Payment (Offline & Online)
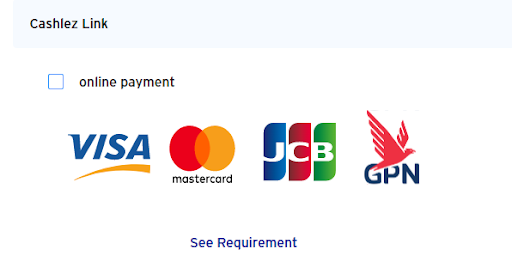
- Cashlez Link
- E-money/E-wallet/QR
- Virtual Account
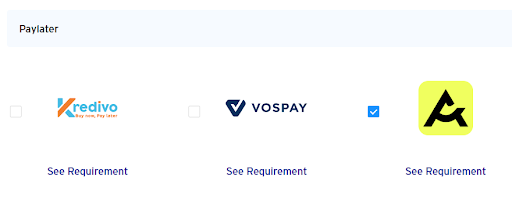
- P2P
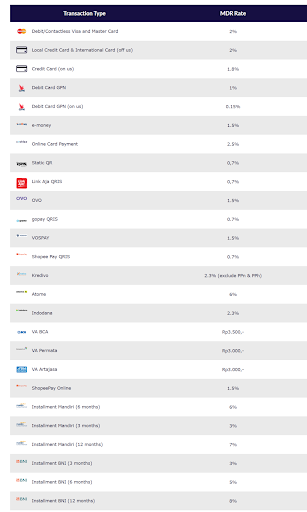
- Click See Pricing button below the P2P payment to display MDR (Merchant Discount Rate).
- Merchant automatically directed to the MDR page and MDR list will be displayed.
- Card Payment (Offline & Online)
- Cashlez Link
- E-money/E-wallet/QR
- Virtual Account
- P2P
- Select the desired payment service for card payment.
- Select the desired payment service for Cashlez Link.
- Select the desired payment service for E-Money/E-Wallet/QR.
- Select the desired payment service for Virtual Account.
- Select the desired payment service for P2P.
- Click Next button. Then will be directed to the next registration page.
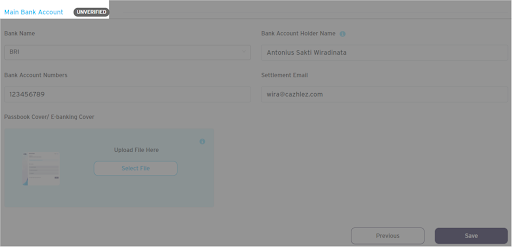
- Fill in Bank Name.
- Insert Bank Account Holder.
- Insert Bank Account Number.
- Insert Settlement Email.
- Upload Passbook Cover by clicking Select File button, then select the chosen file from storage.
- Then, click Save button. Merchant will be directed to the dashboard menu to finish other requirements.
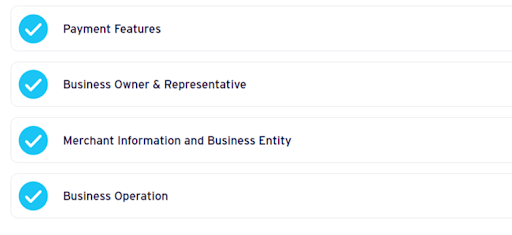
3.1 Payment Features
The purpose of Payment Feature is to set the payment type to the merchant's customer and they could choose their desired payment methods. Hereby some choices of payment features options, such as:


3.2 Settlement Account
Settlement Account form is used for disbursing funds and those funds will be bought.


Before uploading the files, make sure to check instructions for the chosen file from your storage by clicking on the icon i .
Notice how the main bank account changed from blank to unverified after the merchant succeeded to save Settlement Account form.
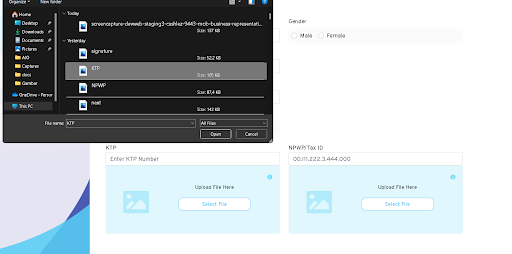
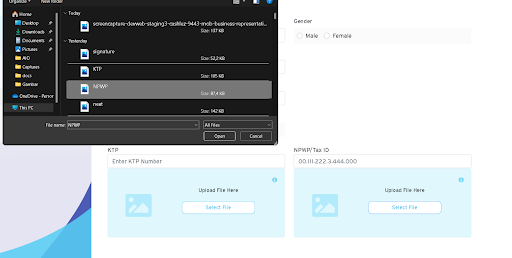
- Fill in Full Name.
- Choose Gender.
- Insert Date of Birth.
- Insert Phone Number and insert secondary Phone Number.
- Insert Email Address and insert secondary Email address.
- Fill in Address with street's name.
- Insert Address Number.
- Fill in Search village or district to search for districts
- Fill in Residence Address form.
- Or Fill in manually if Residence Address is not the same as Address in ID Card.
- Then Click Next after fill form to fill out the document
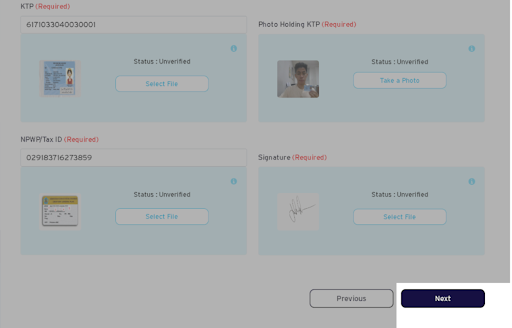
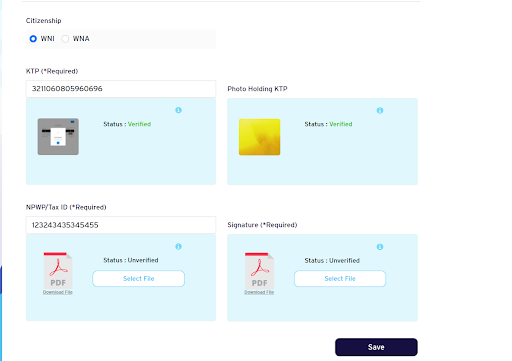
- Insert number and Upload the Required files as WNI (KTP, Photo Holding KTP, NPWP/Tax ID, and Signature).
- Insert number and Upload the Required files as WNA (KITAS, Passport, NPWP/Tax ID, Photo Holding Passport, Signature).
- Insert Identity Card Number or KTP number.
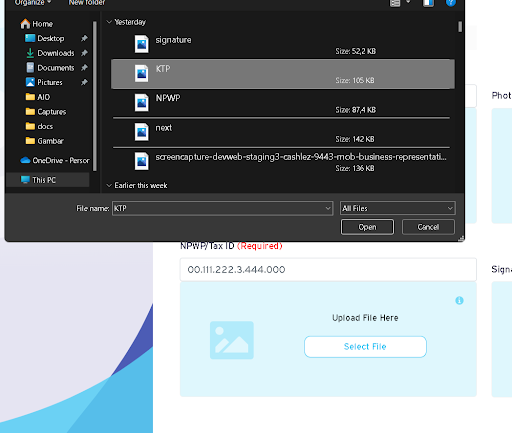
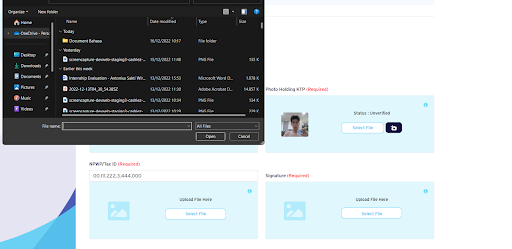
- Upload identity card or KTP by clicking at top-left Select File button, then select the chosen file from storage folder.
- Take a selfie photo while the user/merchant is holding their identity card by clicking at at top-right icon camera button and then click the Save Button to Save the result, or retake Selfie Photo to have a better result.
- Insert Taxpayer Identification Number or NPWP.
- Upload Tax ID card or NPWP by clicking at bottom-left Select File button, then select the chosen file from the storage folder.
- Signature by clicking on bottom-right Select File button, then draw the signature and click save button .
- Then click Next button to continue. Merchant automatically directed to the Business Owner Representative section.
- Fill in Full Name.
- Choose Gender.
- Insert Email Primary address and insert Email Other address (optional).
- Insert Phone Number Primary and Insert Phone Number other.
- Choose Representative's Citizen, WNI or WNA.
- Insert number and Upload Required files as Representative's Citizen of WNI (KTP and NPWP/Tax ID).
- Insert number and Upload Required files as Representative's Citizen of WNA (KITAS, Passport, and NPWP/Tax ID).
- Upload identity card or KTP by clicking at Select File button in KTP Section, then select the chosen file from storage folder.
- Upload NPWP by clicking at Select File button in NPWP/Tax ID section, then select the chosen file from the storage folder.
- Then Click Save button to save Business Owner Information. Merchant will automatically directed to save Dashboard Menu to finish other requirements.
- Then notification save Succes will Pop out after click Save button.
3.3 Document Business Owner & Representative
The function of Document Business Owner is to know the founder / who holds this company and its representatives.
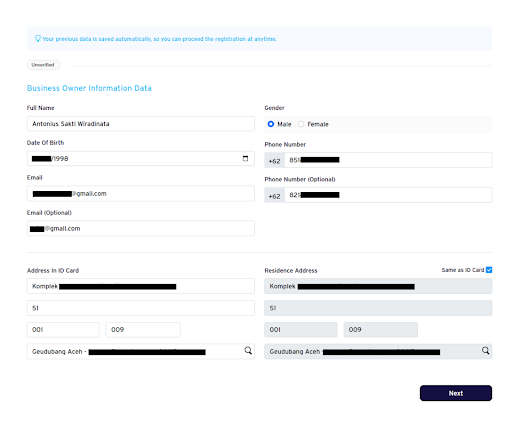
Address Number refers to the merchant's business location. For example, house number.
Filling in district name automatically shows districts with postal code.
By checklist the Same as ID Card checkbox if the Residence Address is the same as Address in ID Card. Residence Address form will be filled automatically.

The Required alerts are based on the chosen payment service, please upload the file with the Required alert only.

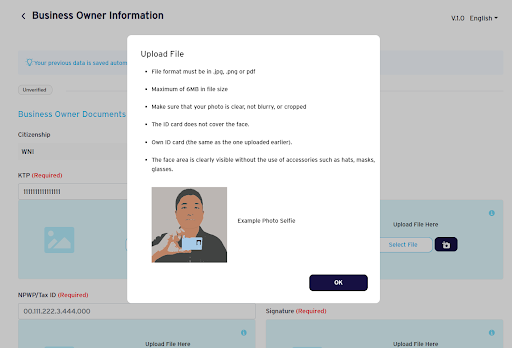
Before uploading the files, make sure to check instructions for the chosen file from your storage by clicking on the icon i.


Upload Data as WNA

Upload data as WNA form
Insert Number and Upload the Required files as WNA. The steps are similar to WNI above.


Insert number and Upload Required files as Representative's Citizen of WNA

Insert Number and Upload the Required files as WNA. The steps are similar to WNI above.

Addtional information :
Notice how Status changed after files have been Verified by Operations.
List of Status Transaction
| Status | Description |
|---|---|
| Unverified | Data that has been uploaded but has not been verified by ops |
| Verified | Verified Data |
| Require Fix | Data that has been checked and requires fix |
- Fill in Trademark.
- Fill in Company Name.
- Insert Established Year.
- Insert Additional Document
- Insert Company NPWP or Company Taxpayer ID.
- Upload Company NPWP card by clicking at top-left Select File button, then select the chosen file from the storage folder.
- Insert NIB or Single Business Number.
- Upload NIB card by clicking at top-right Select File button, then select the chosen file from the storage folder.
- Insert Akta Pendirian number.
- Upload Akta Pendirian license by clicking at center-left Select File button, then select the chosen file from the storage folder.
- Insert SK KEMENKUMHAM number.
- Upload SK KEMENKUMHAM license by clicking at center-right Select File button, then select the chosen file from the storage folder.
- Upload Last Account Statement by clicking at bottom-left Select File button, then select the chosen file from the storage folder.
- Upload Addtional Document by clicking at buttom-right Select File button,then select the chosen file from the storage folder.
- Then, click Save button.
3.4 Merchant Information and Business Entity
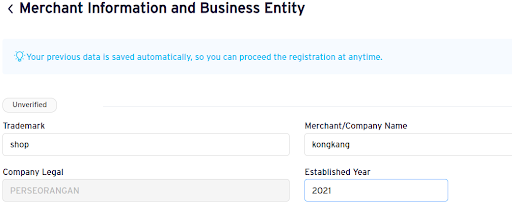
Notice how Company Type is automatically filled in by the chosen Business Type on the sign up page.

Inserts: Select File Additional Document for individual Merchants.

- Fill in Merchant Name.
- Select Sales Preference.
- Offline
- Online
- Fill in Business Category (MCC).
- Insert Business Contact Number and insert secondary Business Contact Number (optional).
- Insert Business Email and insert secondary Business Email (optional).
- Insert Sales Volume Per Year
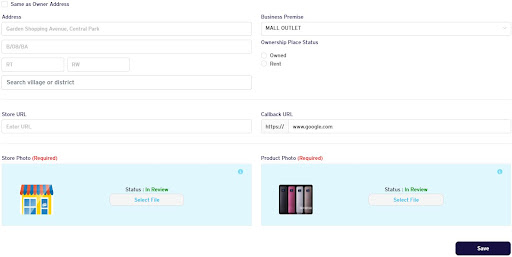
- Click on Same as Owner address checkbox if branch address is the same as Business Owner address.
- Fill in Business Premise.
- Choose Ownership Place Status.
- Insert Store URL.
- Insert Callback URL.
- Upload Store Photo by clicking at left Select File button, then select the chosen file from storage folder.
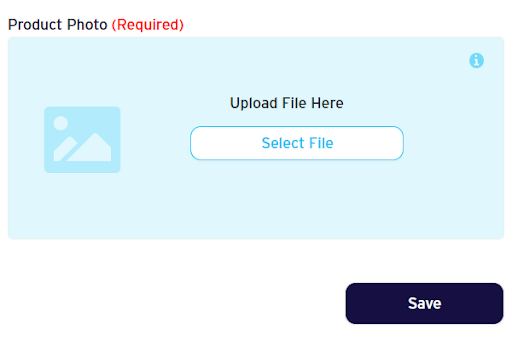
- Upload Product Photo and Store Photo by clicking at right Select File button, then select the chosen file from storage folder.
- Click Save button. Page automatically redirects to the Dashboard Page.
- Then, click Submit button.
3.5 Business Operations

Offline shopping is a traditional way of purchasing services or products by directly visiting to the store/shop/vendor.
Online Shop is a form of electronic commerce which allows consumers to directly buy goods or services from a seller over the Internet using a web browser or a mobile app.
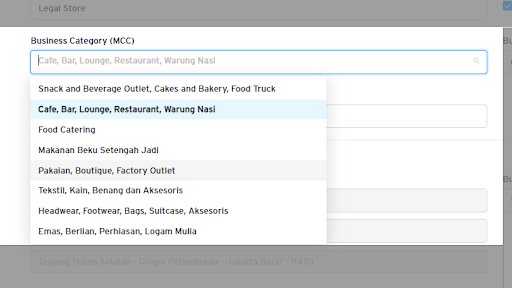
Filling in Business Category automatically searches for related categories.
Form automatically filled in by Owner address information.

Select Business Premise related to the merchant's business.
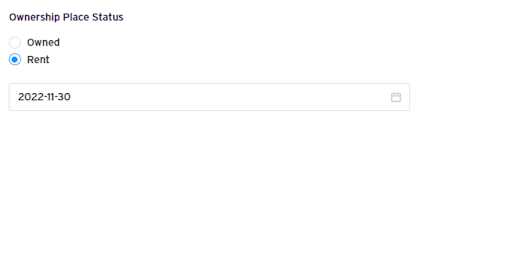
choose one of the 2 owned or rent, if rent then select the date and year the rent ends.
Store URL is the link address of the online store.
Callback URL is the Merchant URL for Payment Integration purposes.

Before uploading the files, make sure to check instructions for the chosen file from your storage by clicking on the icon i .


notice how Branch Register Stages logo changed to blue after all registration stages has been done.
| Logo | Description |
|---|---|
| No Data Submitted, status unverified |
| Data has been submitted, status unverified by ops |
| Data verified by ops |
| Data Requires Fix |
FAQ
Q: What is the difference between Individual Registration and Company Registration?
A: Individual Registration is for a business that is owned and managed by one individual, not incorporated and Company Registration is for a business that is owned by an entity and has their own legal rights and obligations.
Q: If the required mechant documentation is incomplete, is it possible for merchants to consult with Cashlez customer service?
A: Call Cashlez Support at 1 500 539.
Q: Who can access this Merchant on boarding for the merchant registration system?
A: All people who want to become Cashlez Merchant.
Q: How long does the merchant registration verification process take?
A: It requires around 2-3 working days.
Q: What should users do if their account has been locked?
A: Choose Forgot password or call Cashlez Support at 1 500 539